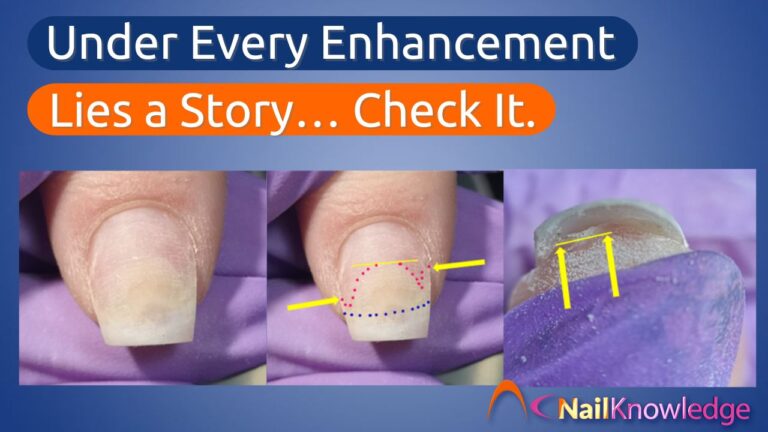
• Pular para navegação primária
  • Pular para o conteúdo principal
  • Pular Rodapé
NailKnowledge

NailKnowledge

  • Cursos
  • Livros eletrônicos
  • Cesta de livros eletrônicos
  • Base de conhecimento
    • Base de conhecimento
    • Pergunte aos especialistas
    • Glossário
  • Notícias
  • Blog
  • Galeria
    • Galeria de arte para unhas
    • Artistas de unhas
    • Junte-se à elite
  • Login

Unhas DIY que deram errado

What to Look for When Redoing or Rebalancing Artificial Nail Enhancements

There’s something incredibly satisfying about removing old gel polish or giving artificial nails a good rebalance. It’s like hitting the refresh button on your client’s hands. But here’s a question we should all ask ourselves: Are we really checking everything we need to when redoing or rebalancing artificial nail enhancements? Because if not, we might be missing warning signs that can turn into serious nail health problems.

When you’ve soaked off that old product or filed back for a rebalance, it’s more than just prepping for a new design. It’s also your window of opportunity, your only real chance to check the client’s natural nails for any signs of trouble. And yes, there’s a lot more to see than just a bit of lifting or growth.

Inspecting the Nail Plate When Redoing Artificial Nail Enhancements

We tend to focus on the surface, rightly so. After all, that’s where we apply product, create shape, and show off our work. But when redoing artificial nail enhancements, we must look closely at the natural nail underneath.

Yellowing on the nail plate? That could be a red flag for onycholysis or inner nail plate damage.
Greenish discolouration? Classic sign of the beginning of a bacterial infection, Pseudomonas aeruginosa is the usual suspect here.
Chalky white patches? That’s potentially white superficial onychomycosis, a type of fungal infection that can easily be mistaken for nothing more than product damage.

Each of these conditions has one thing in common. They are contraindicações. That means you should não continue the service without further assessment or referral. But here’s the kicker: they all need to be treated differently, so identifying the right issue matters.

Why You Must Check Under the Free Edge During Nail Rebalancing

Here’s where things get even trickier. While most techs are trained to inspect the surface of the nail plate, far fewer routinely check underneath the free edge.

Now, I get it. It’s easy to skip. Clients are often in a hurry, we’re watching the clock, and if you’re working with a dark gel colour or builder gel, any issues underneath are effectively masked. But skipping this check is like only cleaning your kitchen counters and ignoring the mould in your fridge. Just because you can’t see it doesn’t mean it’s not there.

Let me show you why this matters.

Onycholysis and What It Means for Redoing Artificial Nail Enhancements

A colleague of mine once discovered significant onicólise when removing her own artificial nails. Now, she knew her stuff, she just hadn’t realised the lateral nail walls were part of what we call the “guardian seals” of the nail unit. Once removed, it revealed widespread nail plate detachment.

What’s shocking is that the onycholysis had eaten up two-thirds of her nail, something you’d never spot from above. The yellow arrows she marked on the photo showed the detachment spreading right into the lateral nail fold. The nail looked completely normal from the top but was hiding a whole world of trouble beneath.

And guess what? That “world of trouble” becomes a five-star resort for bacteria if left untreated.

I want to show you something: Onycholysis

This is what one of my colleagues saw when she removed her artificial nail product – I forgive her for the missing lateral side walls at the time she didn’t realize they were one of the 4 guardian seals of the nail unit.

  • The yellow line shows where the nail plate is attached to the nail bed like it should be.
  • The yellow arrows show where the onycholysis ends but also the amount of detached nail plate in the lateral nail fold.
  • A cor rosa pontua a extremidade proximal da onicólise.
  • Os pontos azuis onde o faixa onicodérmica and the hyponychium should be.
Onicólise
Onicólise – A detailed Look

Have a look at this picture of the nail unit from under the free edge. The yellow arrows and line show the detachment of the hyponychium and onychodermal band.

Onycholysis behind the free edge.

Now imagine if this colleague, was just doing an infill maybe from a dark blue or black hard gel or builder gel polish, no way she would see just how bad the onycholysis is a menos que ela olhasse para trás da borda livre. A onicólise consome quase 2/3rd of the nail! That’s enough space for a family of bacteria and other mean pathogens to have a vacation in for 6 months!

Missing the Signs? Here’s What Can Happen…

Infections don’t wait for your next appointment. If an area of onycholysis is left unchecked, it can create the perfect moist, dark, and protected environment for bacteria like Pseudomonas aeruginosa to move in and wreak havoc.

Pseudomonas Aeruginosa bacterial infection
Pseudomonas Aeruginosa bacterial infection – almost resolved

One salon client here in the Netherlands dealt with such an infection for six months, despite following protocols and seeking proper treatment. That’s how long it can take to correct something that may have started out as a tiny patch of lifting or a crack in the product. And no, removing the nail plate wasn’t an option. Those kinds of extreme measures are for medical professionals, not nail techs.

And it’s not just bacteria. Fungal infections like onicomicose superficial branca can also take hold if water gets trapped under damaged enhancements. These often show up as powdery white patches, sometimes brushed off as “just dryness” or over-buffing damage, when in fact, they require completely different care.

Onicomicose superficial branca

When to Pause During Rebalancing Artificial Nail Enhancements

We all want to give clients beautiful nails, but beauty can’t come at the cost of health. If you see signs of infection or nail trauma, stop. Explain your concerns professionally, show them what you see (photos help a ton here), and refer them to a GP or podiatrist if needed.

Sometimes, infections or reactions aren’t your fault. Maybe the client whacked their hand, cracked the product, and let water seep in. Maybe they’ve developed an allergy to an ingredient. That’s not on you. But missing it? Ignoring it? That’s where things go wrong.

Education Is Power – Keep Learning

We don’t live in a static industry. Nail technology, medical knowledge, and hygiene protocols evolve all the time. What you learned five years ago might already be outdated. That’s why ongoing education is not a luxury, it’s a necessity.

When redoing or rebalancing artificial nail enhancements, you’re not just applying a pretty surface. You’re making health checks. You’re being a professional. You’re being a guardian of your client’s natural nail health.

So next time you prep for a refill or remove that last layer of gel, take a breath. Look under the free edge. Take your time. Ask yourself: “Am I seeing everything I need to see?”

Because prevention isn’t just better than cure, it’s the difference between flawless nails and six months of painful, stubborn recovery.

Let’s keep eyes open, keep learning, and above all, keep those nail beds happy and healthy.

Arquivado em: Unhas DIY que deram errado, Informações gerais

Unhas de gel DIY que deram errado

Evite danos e reações alérgicas com dicas de especialistas

Os aprimoramentos das unhas podem ser lindos, mas o que acontece quando sua rotina de unhas causa mais danos do que benefícios?

O setor de unhas está em expansão, com inúmeros entusiastas recorrendo a kits de unhas DIY em casa. No entanto, uma publicação recente na mídia social de Amy Brown Meyer destaca os possíveis riscos de cuidados inadequados com as unhas. Amy compartilhou suas preocupações sobre a irritação após uma manicure caseira com gel, o que provocou uma resposta detalhada e reveladora de Tracy Anne Shelverton, nossa especialista em unhas.

Tracy’s response is a masterclass in understanding nail and skin health, emphasizing how improper techniques like overfiling or trimming (too much) skin can compromise the protective skin layers around your nails. This not only leads to irritation and swelling but opens the door to potential allergic reactions and or irritation caused by the chemicals in artificial nail products.

Como as unhas de gel feitas por você mesmo podem prejudicar a saúde de suas unhas

De acordo com Tracy, a pele ao redor de suas unhas faz parte do selos de proteção that protect your nails and nail units from pathogens and allergens. However, improper techniques like preenchimento excessivo, corte agressivo ou uso incorreto de ferramentas pode enfraquecer essa barreira.

Quando isso acontece:

  • A pele fica irritada, levando a vermelhidão, inchaço e respostas imunológicas.
  • Os alérgenos de produtos em gel não curados podem penetrar nas camadas danificadas da pele, podendo desencadear reações alérgicas permanentes.

Sem a barreira protetora da pele, os compostos dos produtos para unhas artificiais, especialmente os que contêm acrilatos, podem entrar facilmente no corpo, causando irritação de curto prazo e sensibilidade de longo prazo.

Reações alérgicas a unhas de gel: Riscos e impactos em longo prazo

Um fato alarmante é que as reações alérgicas aos produtos para unhas podem ter implicações que vão além da sua manicure. Tracy adverte que os mesmos compostos encontrados em todos os produtos para unhas artificiais que precisam endurecer também são usados em adesivos médicos e cimento odontológico.

O que isso significa para você:

  • O desenvolvimento de uma alergia agora pode tornar mais complicados os tratamentos médicos futuros, como cirurgia ortopédica ou trabalho odontológico.
  • As reações alérgicas podem levar a inchaço, coceira, vermelhidão e até mesmo sensibilidade crônica a produtos químicos relacionados.

Etapas para proteger suas unhas e pele

Se você gosta de fazer as unhas em casa, há maneiras de se manter segura e proteger a saúde das unhas:

  • Respeite a barreira de sua pele: Evite fazer o preenchimento excessivo ou aparar as dobras das unhas (a pele ao redor das unhas).
  • Evite o contato com a pele: Certifique-se de que os produtos para unhas artificiais, especialmente os géis não curados, não toquem sua pele durante a aplicação.
  • Dê à pele tempo para se recuperar: Se você notar irritação ou vermelhidão, interrompa o uso dos produtos e deixe-os agir. pelo menos três meses para que sua pele se recupere.
  • Considere a possibilidade de fazer testes para alergias: If you suspect an allergic reaction, consult a dermatologist for patch testing to identify allergens.
  • Eduque-se: Invista em treinamento adequado para aprender técnicas seguras de aplicação de unhas. Cursos e livros eletrônicos como os oferecidos por NailKnowledge pode ajudá-lo a dominar a arte de aprimorar as unhas sem comprometer sua saúde.

Uma lição para entusiastas e profissionais de unhas

The story of Amy’s irritated nails is a powerful reminder that beauty should never come at the cost of health. Whether you’re a DIY enthusiast or a professional nail technician, understanding the science behind nails, artificial nail products and skin is crucial for safe and beautiful results.

Perguntas frequentes sobre unhas de gel e reações alérgicas

Q: Can gel nails cause allergic reactions?
Sim, as unhas de gel contêm acrilatos, que são alergênicos. Se eles entrarem em contato com a pele, especialmente se a barreira cutânea estiver comprometida, podem desencadear reações alérgicas como vermelhidão, inchaço ou coceira.

P: Como posso evitar a irritação das unhas de gel DIY?
Evite fazer o preenchimento excessivo das unhas ou aparar a pele. Certifique-se de que os produtos em gel não curados não toquem sua pele durante a aplicação.

P: O que devo fazer se sentir irritação após uma manicure de gel?
Interrompa imediatamente o uso de todos os produtos para unhas e permita que a pele se recupere. Consulte um profissional se os sintomas persistirem e considere a possibilidade de fazer um teste de alergia, se necessário.

Quer saber mais?

Libere todo o seu potencial com o Pacote completo NailKnowledgeO site da empresa, o recurso definitivo para entusiastas e profissionais de unhas.

With lifetime access to everything NailKnowledge has to offer, you’ll gain expert guidance and tools to achieve salon-quality nails while keeping your hands healthy and beautiful.

What’s Included in the NailKnowledge Complete Bundle?

  • 3 cursos abrangentes
  • 18 Aulas
  • 35 pontos de conhecimento
  • 6 eBooks líderes do setor
  • Seu próprio Perfil do artista/salão para mostrar sua experiência

Whether you’re just starting out or looking to deepen your expertise, this one-time purchase equips you with all the tools, insights, and resources to elevate your nail skills.

Sem taxas contínuas, apenas uma vida inteira de conhecimento.

Pacote completo do Nailknowledge

Proteja suas unhas, proteja sua saúde e mantenha suas mãos com a melhor aparência possível, da maneira certa.

Arquivado em: Unhas DIY que deram errado, Informações gerais, Saúde e segurança, Condições das unhas

Aumente o nível de suas percepções sobre as unhas

Participe de nosso boletim informativo!
ASSINAR...

Direitos autorais © NailKnowledge

NailKnowledge

  • Livros eletrônicos
  • Sobre nós
  • Cursos
  • Notícias
  • Blog
  • Boletim informativo
  • Glossário

Políticas

  • Página de privacidade
  • Termos e condições
  • Política de cookies

Suporte

  • Entre em contato conosco
  • Pergunte aos especialistas
  • Suporte ao sistema
  • Perguntas frequentes
Portuguese
Portuguese
English Spanish Vietnamese