When it comes to working with gels, UV curing is one of the most important steps in creating long-lasting, safe nail services. But how much do you really know about how UV light works inside your products?
The truth is, UV light doesn’t travel very far. That means the way you apply and cure your gels makes all the difference between strong, beautiful nails and soft, under-cured layers that can cause problems later.

What Is UV Light Curing and Why It Matters for Nail Techs
Think of UV light as a tool that hardens your gels. But like any tool, it has limits. UV light can only go so deep before it gets blocked, absorbed, or reflected. Even your natural nail plate has built-in UV protection, about the same as wearing SPF 40 sunscreen.
This is why you never see a sunburn on the nail bed. The nail plate stops most of the light. And it’s the same with gels: the thicker or darker the product, the harder it is for UV light to reach the bottom.
Understanding Depth of Cure in Gel Products
If you apply a gel coat that’s too thick, the top may look shiny and cured, but underneath it can still be soft or gooey. That’s under-curing, and it’s a common problem.
Simple rule:
- Apply thin, even coats.
- Cure each layer fully before applying the next.
- Avoid blobs or extra-thick applications.
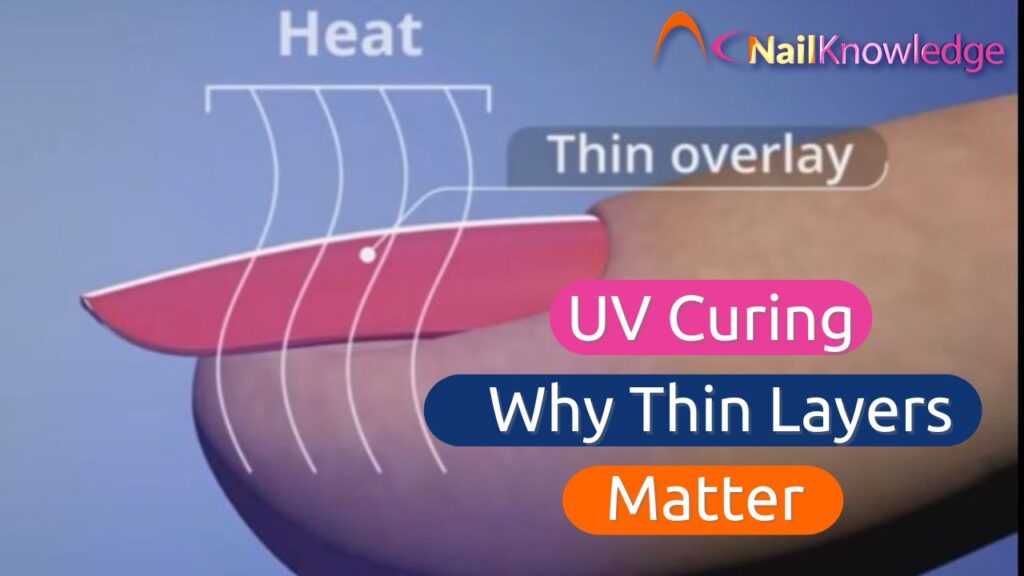
Imagine your gel layer like two sheets of paper stacked together, that’s about the right thickness for good UV curing.
The “Umbrella Effect” in Dark and Glitter Shades
Clear or light shades allow UV light to pass through easily, so they’re simpler to cure. But dark gels like black, deep red, or chocolate brown, and glitter-packed gels behave differently.
Scientists call it the “umbrella effect.” The pigments and glitter pieces act like tiny umbrellas, casting shadows that block UV light from reaching the bottom layers. This is why dark or glitter gels are trickier to cure and are specially formulated by manufacturers.
Best practice for nail techs:
- Apply dark or glitter colors in extra-thin coats.
- Cure each layer for a full minute.
Why over-curing doesn’t work
Many nail techs think leaving the hand in the lamp longer will “fix” under-curing. Unfortunately, that’s not the case:
- Photoinitiators have limits: These are the ingredients that react to UV light to cure the gel. Once they’re all used up, the reaction is complete. More time won’t make a difference.
- Blocked light can’t be fixed: If the gel is too thick or pigmented, the bottom layers never get enough UV. Extra minutes won’t help because the light simply doesn’t reach them.
- Heat spikes explained: Heat spikes happen during the early stage of curing when lots of gel hardens quickly and releases heat. This is strongest if the layer is too thick or if the lamp has very high UV intensity. Once the reaction is complete, extra curing won’t create more heat, but it also won’t improve the cure.
👉 This is why thin, even layers with the correct lamp are far more effective than trying to cure longer.
Safety Risks of Improper Curing
When gel isn’t fully cured, it’s not just a service issue. The uncured product can stay soft inside the layer and even seep into the sidewalls, cuticle area, or around the seals of the nail. Once it touches living skin, repeated exposure can trigger allergic reactions that may last a lifetime.
That’s why proper UV curing is essential for both safety and performance:
- Use the lamp recommended by the gel brand.
- Apply thin, even layers so light reaches all the way through.
- Keep product away from skin at all times.
- Make sure every layer is fully cured before adding the next.
Best Practices for Successful UV Curing Every Time
UV curing is most effective in thin, even layers. By applying product correctly and curing with the right lamp, you’ll achieve beautiful, durable nails while also keeping your clients’ skin safe.
✅ UV Curing Do’s & Don’ts for Nail Techs
✅ Do
- Apply thin, even layers for better curing.
- Cure each layer fully before applying the next.
- Use the lamp recommended by your gel brand.
- Keep gels off the skin to avoid allergies.
- Apply dark and glitter gels extra thin and cure for at least one minute.
❌ Don’t
- Apply blobs or thick coats (they won’t cure properly).
- Assume curing longer than 2 minutes will fix under-curing.
- Mix and match lamps with different gel brands.
- Ignore sticky, soft, or gooey layers — that’s a sign of under-curing.
- Let uncured gel touch your skin or your client’s.