• Saltar a la navegación principal
  • Saltar al contenido principal
  • Saltar al pie de página
Conocimientos de uñas

Conocimientos de uñas

  • Cursos
  • Libros electrónicos
  • Cesta de libros electrónicos
  • Base de conocimientos
    • Base de conocimientos
    • Pregunte a los expertos
    • Glosario
  • Noticias
  • Blog
  • Galería
    • Galería Nail Art
    • Artistas de uñas
    • Únete a la élite
  • Inicio de sesión

Información general

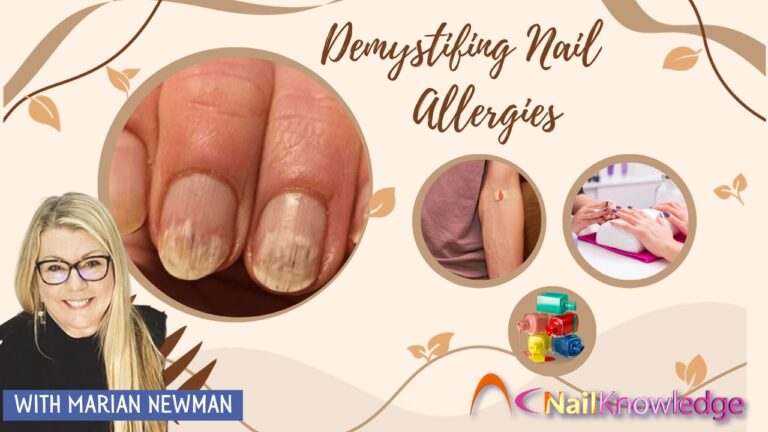
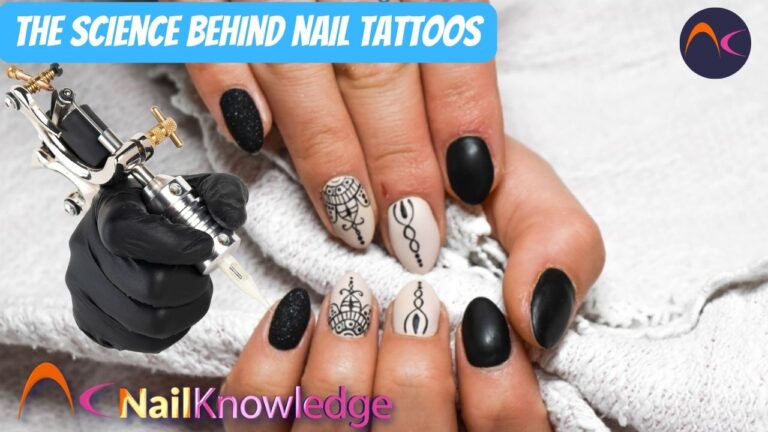
La ciencia detrás de los tatuajes de uñas: Una guía completa

Nail art has evolved significantly in recent years, surpassing traditional manicures and pedicures. Tattoos have become a captivating trend, growing with heightened artistic expression. These miniature masterpieces empower individuals to express their distinctiveness through self-expression. But have you ever wondered about the scientific principles behind them? What makes them so resilient?

En esta extensa guía, nos adentraremos en la intrigante ciencia de los tatuajes de uñas, con opiniones de mejores artistas del tatuaje en California y respaldada por una investigación científica exhaustiva.

Orígenes de los tatuajes de uñas

Surgida de la ancestral decoración de uñas traditions, tattoos, alternatively known as decals or wraps, have historical ties to civilizations such as the Chinese, Egyptians, and Indians. These cultures adorned their nails with diverse materials for aesthetic purposes. However, the contemporary tattoo trend emerged in the late 20th century, creatively meeting the demand for intricate and detailed designs.

Expresión de la individualidad

El principal objetivo de los tatuajes de uñas reside en su capacidad para expresar la individualidad. Tanto si se opta por un diseño geométrico minimalista, un alegre diseño floral o un meticuloso retrato, constituyen una plataforma para que las personas muestren su personalidad, sus intereses y su creatividad en un lienzo compacto pero influyente. La gama de diseños garantiza un tatuaje de uñas adecuado para cada estilo, estado de ánimo y ocasión.

Comunidad y tendencias

El auge de las redes sociales ha influido en el creciente atractivo de los tatuajes de uñas. Instagram y Pinterest son galerías virtuales donde artistas y aficionados exponen sus últimas creaciones. Sirven de inspiración para que otros exploren diversos estilos y técnicas.

Las tendencias en tatuajes de uñas reflejan con frecuencia los movimientos de la moda y el arte, poniendo de relieve la naturaleza dinámica de esta vía de autoexpresión en continua evolución.

Conceptos básicos

Los tatuajes de uñas representan una fascinante intersección de arte y ciencia, que traspasa los límites de la estética tradicional de las uñas. A diferencia de los esmalte de uñas, which forms a solid layer upon drying, nail tattoos utilize a unique approach by employing ink that adheres to the nail’s surface.

At the heart of nail tattoos is the formulation of specialized inks designed to bond effectively with the keratin structure of the nails. These inks often consist of pigments suspended in a liquid base, carefully crafted to ensure optimal adherence and durability. Artists choose them for their vibrancy and ability to maintain integrity on the nail’s surface over time.

Materiales y técnicas

Los tatuajes de uñas adoptan diversas formas, desde calcomanías al agua y pegatinas hasta intrincados diseños pintados a mano. Estas son algunas de las técnicas y materiales más utilizados para crearlos:

  1. Water Decals: The most common type of nail tattoo. They are a thin film that transfers onto using water. The process involves submerging the decal in water, placing it into position, and sealing it with a top coat to achieve a seamless result.
  2. Nail Stickers: Pre-designed adhesive decals for direct application. Available in various shapes, sizes, and patterns, they offer limitless possibilities for customization.
  3. Gel Transfers: A design placed onto the nail using a special gel or adhesive. Employing this method leads to a tattoo that is long-lasting and more resilient.
  4. Diseños entintados: Para quienes buscan uñas únicas y personalizadas, los diseños con tinta ofrecen un toque único. Los artistas expertos pueden crear obras de arte intrincadas y detalladas.

Aplicación de tatuajes en las uñas

La aplicación de tatuajes de uñas es un proceso preciso basado en los principios de la ciencia:

  1. Surface Preparation: Nail surface preparation before applying them is very important. It involves removing oils that could interfere with the application’s efficacy.
  2. Mecanismo de aplicación: La aplicación utilizada en los tatuajes crea una fuerte unión con la uña, garantizando una conexión segura pero suave.
  3. Air Removal: Research-based techniques are employed to eliminate trapped air bubbles during application, ensuring a seamless, professional finish contributes to the design’s longevity.
  4. Top Coat Protection: Many nail tattoos require a scientifically formulated top coat, which enhances the design’s vibrancy and adds a protective layer, extending the design’s lifespan.

La longevidad de los tatuajes de uñas

Varios factores influyen en la longevidad de los tatuajes de uñas.

  1. Water Resistance: Nail tattoos resist exposure to water. It prevents smudging and lifting of the design, even in moist conditions.
  2. Flexibility: The vinyl or polymer material is sufficiently flexible to conform to the nail’s shape sin agrietarse ni descascararse, incluso con movimientos naturales.
  3. Desgaste: Una manipulación suave puede prolongar considerablemente la vida útil de los tatuajes de uñas.
  4. Top Coat’s Protective Role: The formulation of top coats plays a pivotal role in protecting nail tattoos from chipping, fading, or scratching, ensuring a design that endures.

Reconstrucción del lecho ungueal

Medical tattooing serves to help restore a patient’s physical well-being while aiding in their psychological recovery from the impacts of disease, surgery, or trauma. It becomes essential with surgically removed nails [1].

Normalmente, el tatuaje médico es un proceso que requiere múltiples sesiones para integrar matices de color precisos y lograr un resultado extraordinariamente realista. Requiere la colaboración de un artista médico cualificado con amplia experiencia en este campo especializado.

The precise and safe implementation of the treatment depends on the tattoo artist possessing a thorough grasp of specific techniques and adeptly handling the necessary materials. Frequently, unsatisfactory results arise due to the operator’s lack of experience and knowledge of the process employed during the treatment.

La importancia y el potencial del uso de tatuajes con fines médicos se ponen de manifiesto cuando pueden mejorar o perfeccionar los resultados obtenidos mediante cirugía plástica. Puede ayudar a evitar la necesidad de procedimientos invasivos adicionales.

La aplicación del tatuaje médico para restaurar la estética del lecho ungueal supone un avance significativo que subraya la versatilidad de esta técnica. Con la supervisión de un médico y un artista cualificados, un paciente puede recuperar la sensación de integridad física sin correr riesgos para su salud.

Conclusión

Nail tattoos represent a harmonious mix of artistic expression and scientific creativity, transcending mere fashion views. Continual research and innovation have led to the development of exceptional and enduring tattoos. With this trend’s evolution, we can expect future breakthroughs in materials and techniques, enhancing their accessibility even further.

The next time you find yourself admiring the detailed nail art gracing your or someone else’s fingertips, take a moment to acknowledge the inventive prowess that breathes life into these designs. Tattoos are a remarkable testament to the fusion of creativity and scientific advancement within beauty and self-expression.

Referencias

  1. Alberto Renzoni, Antonia Pirrera, Alessandra Lepri, Paolo Cammarata, Rita Molinaro and Alessandro Dalla Vedova. Medical tattooing, the new frontiers: a case of nail bed treatment (2017). — DOI: 10.4415/ANN_17_04_10

Publicado en: Información general, Servicios de uñas

Formación de las uñas en los fetos en desarrollo

Desde el principio: El fascinante viaje de la formación de las uñas en los fetos en desarrollo

Ever wondered how those tiny fingernails and toenails come to be on a developing fetus? It’s a fascinating journey that begins long before birth. In this article, we’ll delve into the intricate process of nail formation in the womb. Get ready to be amazed by the hidden world of fetal nail development, where perplexity and burstiness intertwine to create these essential yet often overlooked appendages.

El plano: Fundamentos del aparato ungueal

Before we dive into the fetal realm, let’s start with the basics. Nails, those handy protectors at the tips of our fingers and toes, serve a myriad of purposes. They shield our delicate digits, aid in everyday tasks, and even contribute to our sense of touch and dexterity. But how do they form in the first place?

The nail apparatus comprises the nail plate and several surrounding structures: the nail matrix, nail bed, proximal nail fold, and hiponiquio. Think of it as a complex construction project unfolding in the tiniest workshop imaginable. Each element plays a crucial role in crafting the final product – your nails.

Comienza el viaje: La formación de las uñas en el feto

Now, let’s step into the fetal world, where the magic of nail development unfolds. The story begins around the 8th week of gestation, when the first signs of nail formation make their appearance. This is the moment when cells start to differentiate, marking the beginning of a remarkable journey.

At this early stage, a rectangular thickening of the epithelium appears on the dorsal surface of the developing digits. It’s known as the “nail field,” bordered by four grooves. These grooves resemble arched borders, with each one continuing the adjacent one. The proximal groove, the deepest of them all, takes on a transverse direction, with the apex located toward the digit’s midline.

Surprisingly, fingernails seem to develop this feature as early as 7 weeks of gestation, while toenails are a bit more camera-shy and aren’t yet recognizable. The distal groove, shallow at this point, separates the nail field from the epidermis on the volar surface of the fingers.

La fase de las uñas cortadas

Around the 9th week, a remarkable transformation occurs. The nail field in the fingers enlarges and adopts a dome-like shape, raising the prominence of the proximal groove. It’s like the early stages of a construction project where the foundation is being set. Interestingly, this gives the nail complex a “clubbed nail” appearance, but don’t be fooled – this is just a transient phase.

Hacia la undécima semana, el campo ungueal de los dedos de los pies decide por fin hacer su debut, completado con su equivalente ranuras para clavos. Sin embargo, las uñas de los pies adoptan un enfoque diferente, optando por una forma más rectangular, con el lado más largo perpendicular a la dirección de los dedos. En este caso, los surcos laterales de la uña son notablemente más cortos que el surco proximal, especialmente en los dedos 2-5.

La creciente complejidad

As fetal development progresses, the nail field in fingers undergoes further changes. By the 12th week, the nail field’s height starts to decrease, and the proximal groove deepens and narrows. It’s as if the building is starting to take shape, with the walls of the nail matrix rising to create the foundation for the nail plate.

Around the 16th week, the nail plate finally emerges from beneath the proximal nail fold. It appears as a semi-circular, flat structure with a smooth surface. Proximal and parallel to the distal groove, a new feature emerges – the distal ridge. In this early stage, the ridge is somewhat inconspicuous, sporting a blunt border.

Mientras tanto, las uñas de los pies siguen su propio calendario. A las 18 semanas, la lámina ungueal empieza a mostrarse y el reborde distal se hace perceptible. Ambas estructuras de las uñas de los pies se parecen a las que se observan en la fase de 12 semanas de desarrollo de los dedos.

Uñas como las de los adultos

Si avanzamos hasta la semana 25, veremos las etapas finales del desarrollo de las uñas del feto. En los dedos, la lámina ungueal sigue creciendo y ahora se asemeja a una estructura arqueada que cubre aproximadamente la mitad del campo ungueal. La cresta distal, que ha ganado nitidez y altura, se convierte en el punto focal.

At this point, the distal groove widens and becomes shallower, while the lateral grooves are nearly concealed by the evolving nail plate. It’s as if the finishing touches are being added to our construction project, bringing us closer to the familiar adult-like nails we know.

Conclusión

El viaje de formación de las uñas en el feto es una cautivadora narración de desarrollo, transformación y crecimiento. Desde la aparición inicial del campo ungueal hasta la aparición de la placa ungueal y el reborde distal, cada etapa está marcada por intrincados cambios que culminan en la creación de nuestras prácticas uñas de manos y pies.

So, the next time you admire your nails or help a newborn trim theirs, remember the incredible journey that took place long before birth – a journey filled with perplexity and burst

Publicado en: Información general

Lámparas UV para uñas: una visión completa

Since UV technology revolutionised our industry, we have long relied on UV nail lamps for curing various types of nail coatings. Yet, these devices, whether using fluorescent-style bulbs or LED diodes, still puzzle many nail professionals as they carry differences that are critical to understand. 

Let’s have a look if we can help shed some light on this matter, with nine important facts to consider about both fluorescent-style Lámparas UV para uñas y lámparas UV para uñas de tipo LED.

1. Lámparas UV: Comprender la variación de la lámpara en el endurecimiento de uñas

   – Both styles of lamp cure gel products by producing UV energy. The main difference between both is how this energy is created. LED nail lamps use diodes as bulbs, whereas traditional models rely on fluorescent tubes.

2. Velocidad de curado y emisión de UV:

   – LED (which stands for ‘light emitting diode’) nail lamps produce higher levels of UV energy, which makes them much faster than the old fluorescent style lamps in curing nail coatings. They are the standard at the moment, as they are faster and consume less energy.

3. Longitudes de onda e intensidad:

   – LED diodes emit fewer UV wavelengths (narrower spectrum of cure) but at higher intensities (faster), while fluorescent tubes produce numerous wavelengths (higher spectrum) at lower intensities (slower), resulting in different ranges of cure methods for UV gels. 

4. Eficiencia energética frente a emisión UV:

   – Surprisingly, LED-style UV nail lamps, despite their faster curing, operate at around 30% lower wattages, so it will save you in energy bills.

This is also great proof that wattage is not indicative of UV emission, as many seem to believe.

5. Riesgos potenciales:

   – LED nail lamps, if used on UV gels formulated especially for fluorescent-style lamps, can overcure, which can lead to severe heat spikes, nail bed burns and plate separation, potentially causing infections or loss of the nail plate completely.

6. Comprender la variación de intensidad en las lámparas UV para uñas:

   – Different LED nail lamps can emit significantly different amounts of UV, suggesting that not all LED-style UV nail lamps are equal in UV emission. This is a very important point!!! As they produce a narrower spectrum of UV wavelengths, we can never use the same Lámpara UV para curar todos los productos, which is the same as saying that a universal lamp doesn’t exist!

7. Garantía de seguridad:

   – Both fluorescent and LED nail lamps have undergone safety tests and are confirmed not to cause cancer, if used according to manufacturer’s guidance. 

 Ambos tipos de lámparas son más seguras que la exposición natural a la luz solar, ya que reducen los riesgos asociados a la exposición a los rayos UV. Las lámparas de uñas solo producen rayos UVA, que no son perjudiciales para la piel si se utilizan adecuadamente.

8. Esperanza de vida:

   – Typically, both styles of nail lamps will deteriorate over time with usage and will require replacement after approximately three years of normal use.

Los diodos LED no pueden sustituirse, lo que significa que habrá que cambiar toda la máquina; mientras que los tubos fluorescentes suelen necesitar una sustitución media de 2 a 3 veces al año, por lo que ambos suponen un aumento de los costes de mantenimiento.

9. Calibración y compatibilidad del fabricante:

    – As we mentioned above, manufacturers will tailor UV gels to work well with specific lamps, so there isn’t a universal gel compatible with all nail lamps, emphasizing the need for specificity in product selection.

Dominio de las lámparas UV para uñas: Ciencia, seguridad y éxito en el salón de manicura

Los profesionales de los salones de manicura deben conocer las diferencias entre los dos estilos de lámparas de uñas y cómo favorecen el endurecimiento del producto en la lámina ungueal. Este conocimiento es crucial para garantizar un curado adecuado, minimizar los riesgos y maximizar la eficacia de los tratamientos de uñas.

Aunque pueda parecer mucho esfuerzo, comprender la ciencia que hay detrás de nuestro trabajo es esencial. Garantiza que mantengamos los más altos niveles de seguridad y profesionalidad, lo que, a su vez, conduce a una carrera larga y exitosa.

Publicado en: Información general, Gel UV

Sistemas de inmersión para uso doméstico

Están apareciendo muchas marcas con sistemas de inmersión para uso doméstico. ¿Qué puede decir a las clientas que están pensando en comprar uno en lugar de recurrir a los servicios de un salón de manicura?

The Dip system is popular in the US and due to this something called ‘dip flu’ has been identified as a real issue.

This is about the vapours from the cyanoacrylate adhesive that is used instead of a Sistema de gel UV. This glue is used in the nail sector for sticking tips on. It can be dangerous as, if you spill some on your leg and you’re wearing jeans, for example, it creates an intense heat and can seriously burn the skin under the fabric.

Además, lo más probable es que el polvo utilizado sea el polvo utilizado en un sistema L&P and not powder specifically manufactured for this. Powders for L&P have peróxido de benzoilo in them and this is a known irritant and can cause painful skin irritations.

It is easy to do at home and many who try it will be tempted to use it on friends and relations. But they won’t understand the hygiene hazards of several people sumergiendo en la misma olla de polvo.

Todas estas cuestiones son las mismas para un profesional que utilice este sistema, pero deberían tratarse en la formación si se trata de un buen curso.

Explíqueselo a sus clientes e intente disuadirles de probar este producto de bricolaje. Adviértales de los peligros e incluya también que, independientemente de lo que diga el marketing, se tarda bastante en eliminar con acetona por lo que muchos recurrirán a arrancársela, lo que dañará sus uñas durante mucho tiempo.

Publicado en: Información general, Servicios de uñas, Química del producto

El papel del HEMA en la industria de las uñas

¡Bienvenidos a nuestra minilección sobre HEMA en la industria de las uñas!

This lesson is aimed at all nail professionals, from beginners to advanced technicians, as well as nail enthusiasts who want to learn more about this important ingredient in nail products. Our goal is to explain the basics of HEMA sin abrumarle con jerga técnica, para que pueda comprender mejor sus propiedades, beneficios y riesgos potenciales.

We’ll cover what HEMA is, the chemistry behind it, its properties and benefits, examples of nail products that contain HEMA, y los posibles problemas de seguridad relacionados con su uso. 

¿Qué es el HEMA? 

HEMA or Hydroxyethyl Methacrylate (CAS# 868-77-9), is a monomer or simply put, a liquid ingredient that’s commonly used in the nail industry to create strong, durable and flexible nail products.

It works by bonding well with other ingredients in the product and with your natural nails. (HEMA adheres as well to a nail plate containing water or where surface water is present as a dry well prepped nail plate)

When the photo initiators in the product are exposed to UVA energy HEMA forms long polymer chains of molecules, which help create a strong and flexible solid material.

This means that when you apply a product with HEMA, it can create a smooth and even surface that’s less likely to chip or break. HEMA can also help the product stick and adhere better to your natural nails and resist lifting.
HEMA is a known allergen but when used correctly and professionally, it is safe at or below the recommended percentage of 35%. 

Algunos ejemplos de productos para las uñas que pueden contener HEMA include acrylic powders and liquids, gel polishes, and nail primers.

These products are made up of a mixture of different ingredients, including pigments, fragrances, and other additives, along with HEMA.

Comprender los riesgos y las precauciones de seguridad del uso de HEMA en productos para las uñas

En HEMA is an important ingredient in many nail products, it’s important to be aware of the potential risks associated with its use. Exposure to incorrect use of HEMA can lead to skin irritation, allergic reactions, and other health problems.

To minimize the risk of exposure for both you and your client, it’s important to follow proper safety precautions when working with all nail products. This includes wearing gloves, working in a well-ventilated area, and avoiding skin contact at all times. Additionally, it is advisable to ensure that the percentage of HEMA (hydroxyethyl methacrylate) in the products is 30% or, preferably, lower.

If you or your clients experience any signs of irritation or allergic reaction from using HEMA que contengan productos, como enrojecimiento, hinchazón, ampollas o picor, deje de utilizar el producto inmediatamente y busque atención médica si es necesario.

Regulatory guidelines related to HEMA use in nail products vary by country and region. In the United States, the Food and Drug Administration (FDA) regulates nail products and sets guidelines for the safe use of ingredients like hema. In Europe and the united kingdom, they have also established guidelines for the safe use of HEMA in nail products. Products containing HEMA are restricted to professional use only.

As a nail technician, it’s important to stay up-to-date with regulatory guidelines and to use HEMA containing products safely and responsibly. By following proper safety precautions and using products according to manufacturer instructions, you can help minimize the risk of exposure and keep yourself and your clients safe.

Declaraciones de ausencia de HEMA y presencia de Di-HEMA

If a product is advertised as HEMA free, why does the label say that it contains Di-HEMA?
Esta es una pregunta que nos hacen a menudo en NailKnowledge. Así que la abordaremos aquí con un ejemplo para ponerla en contexto.
If a product contains DI-HEMA but is advertised as HEMA-FREE, it is because DI-HEMA is a similar ingredient but is structurally different from HEMA.

However, it’s important to note that some individuals who are sensitive or allergic to HEMA may also have a reaction to DI-HEMA, as it is still a type of methacrylate. So, it’s always important to read product labels carefully before using any new product, especially if you have a history of skin allergies or sensitivities.  There are many HEMA free products available on the market but be aware, if an individual develops an allergy to HEMA, it is very likely they are also allergic to other monomers. The only way of knowing is to have a dermatological patch test to identify the exact ingredient to avoid.

There are many HEMA free products available on the market but be aware, if an individual develops an allergy to HEMA, it is very likely they are also allergic to other monomers. The only way of knowing is to have a dermatological patch test to identify the exact ingredient to avoid.

Estableciendo paralelismos: HEMA y Di-HEMA

An example to compare the relationship between HEMA and DI-HEMA could be comparing the difference between skimmed milk and whole milk. Although both are types of milk, they have different properties and are produced differently.

La leche desnatada se produce eliminando el contenido graso de la leche entera, mientras que la leche entera contiene toda la grasa que se encuentra de forma natural en la leche. Aunque ambos tipos de leche son blancos y líquidos, tienen perfiles nutricionales distintos y pueden utilizarse de manera diferente en la cocina y la repostería.

Similarly, while DI-HEMA is chemically related to HEMA, they are different ingredients with different properties and functions. It’s important to read product labels carefully and understand the specific ingredients included in a product before using it, just like it’s important to understand the difference between skimmed milk and whole milk when cooking or baking.

Concluyendo: Comprender el HEMA y una invitación a profundizar

Así concluye nuestra mini lección sobre HEMA, en la industria de las uñas. Esperamos que esta información le haya sido útil para comprender los aspectos básicos de este importante ingrediente de los productos para las uñas.

If you’re interested in diving deeper into the science behind nail products, we invite you to check out our “Essential Nail Professional” course. This course provides a more comprehensive exploration of the chemistry behind nail products, including the role of monomers, polymers, and HEMA. By enrolling in this course, you’ll gain a deeper understanding of the products you use every day and how to use them safely and effectively.

¡Gracias por aprender con Nail Knowledge y esperamos verte en línea muy pronto!

Publicado en: Información general, Servicios de uñas, Química del producto

Desmitificar las alergias ungueales

Entender las causas, los síntomas y la atención responsable

There is still a great deal of obvious confusion over nail allergies and what to do about them.

Buscando consejo para la alergia a las uñas en las redes sociales

Hay innumerables fotos en SM pidiendo opiniones, aunque muchos afirman que no somos médicos por lo que no podemos diagnosticar. ¿Entonces qué?

If clients have been wearing nail coatings that are known to be allergenic and symptoms appear it doesn’t matter if they have had the same nail service for a long period of time with no reaction as it can take years for an immune response to occur. 

The only next step is to seek a medical diagnosis. Many general practitioners lack knowledge about common acrylate reactions, often dismissing them as fungal infections or prescribing antibiotics or steroid creams.

No one should take antibiotics unless necessary as the body can build up an immunity to them and they will not work when their use is urgent. Steroid creams can thin the skin and do not cure an allergic reaction.

Pasos esenciales para las reacciones alérgicas y la identificación de hongos

The definitive step to remedy an allergic reaction involves complete removal of the allergen, which, in this case, refers to the nail coating.

Para determinar si un síntoma se debe a una infección fúngica, el método esencial son las pruebas.

The only real answer to know what to do with a potential allergy is to have a dermatology patch test and one specifically for acrylates and methacrylates (which not all dermatologists are qualified to do!). If a GP refuses to refer the patient to a dermatologist, then they should be advised that the patient has had a known allergen such as a nail coating. Once this is done and results are received, the very specific ingredient can be avoided.

Productos sin HEMA para alergias ungueales

It can be worth trying one nail with a HEMA-free product but the individual may, by that time, be allergic to many other acrylates or on the verge of becoming allergic. But if a client is insistent it can be done as long as the client agrees to return in one week to have it removed to see the condition of the nail plate and nail bed.

Pruebas previas de alergenos: Imprescindible antes de aplicar el recubrimiento de uñas

Until this testing has been carried out no coating should be applied. If it is then the nail professional is liable for causing any further damage and wide open to a liable action.

Cuando se produce una reacción, hay que animar a la clienta a que lo comunique a la Oficina de Atención al Ciudadano (Citizens Advice Bureau) y al profesional de uñas a que lo comunique al fabricante.

Prevención de las alergias ungueales: Curado correcto y seguridad de los productos ungueales

Hay muchos alérgenos conocidos que se utilizan en los productos para las uñas, pero están permitidos, ya que el producto no debe entrar en contacto con la piel y debe estar bien curado. Consulte toda nuestra información sobre a cura adecuada y vea nuestro vídeo sobre clavos Alergias y cómo se producenpara entenderlo mejor.

Reacciones con HEMA y monómeros

It is not always HEMA that is the problem but reacting to HEMA can lead to reactions from other monomers.

Es muy importante que todos los profesionales de las uñas sepan qué hacer en estas circunstancias, ya que todo lo que no sea esto es poco profesional y expone a sus clientes a problemas y daños a largo plazo.

Publicado en: Información general, Acabar con los mitos, Afecciones de las uñas, Servicios de uñas

  • « Ir a la página anterior
  • Página 1
  • Páginas intermedias omitidas ...
  • Página 13
  • Página 14
  • Página 15
  • Página 16
  • Página 17
  • Páginas intermedias omitidas ...
  • Página 30
  • Ir a la página siguiente »

Mejora tus conocimientos sobre uñas

Suscríbase a nuestro boletín
SUSCRÍBETE...

Copyright © NailKnowledge

Conocimientos de uñas

  • Libros electrónicos
  • Quiénes somos
  • Cursos
  • Noticias
  • Blog
  • Boletín
  • Glosario

Políticas

  • Página de privacidad
  • Condiciones generales
  • Política de cookies

Ayuda

  • Póngase en contacto con nosotros
  • Pregunte a los expertos
  • Soporte del sistema
  • Preguntas frecuentes
Spanish
Spanish
English Portuguese Vietnamese