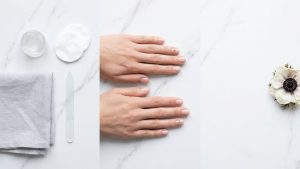
There’s something incredibly satisfying about removing old gel polish or giving artificial nails a good rebalance. It’s like hitting the refresh button on your client’s hands. But here’s a question we should all ask ourselves: Are we really checking everything we need to when redoing or rebalancing artificial nail enhancements? Because if not, we might be missing warning signs that can turn into serious nail health problems.
When you’ve soaked off that old product or filed back for a rebalance, it’s more than just prepping for a new design. It’s also your window of opportunity, your only real chance to check the client’s natural nails for any signs of trouble. And yes, there’s a lot more to see than just a bit of lifting or growth.
Inspecting the Nail Plate When Redoing Artificial Nail Enhancements
We tend to focus on the surface, rightly so. After all, that’s where we apply product, create shape, and show off our work. But when redoing artificial nail enhancements, we must look closely at the natural nail underneath.
Yellowing on the nail plate? That could be a red flag for onycholysis or inner nail plate damage.
Greenish discolouration? Classic sign of the beginning of a bacterial infection, Pseudomonas Aeruginosa is the usual suspect here.
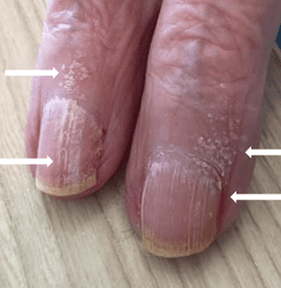
Chalky white patches? That’s potentially white superficial onychomycosis, a type of fungal infection that can easily be mistaken for nothing more than product damage.
Each of these conditions has one thing in common. They are contraindications. That means you should not continue the service without further assessment or referral. But here’s the kicker: they all need to be treated differently, so identifying the right issue matters.
Why You Must Check Under the Free Edge During Nail Rebalancing
Here’s where things get even trickier. While most techs are trained to inspect the surface of the nail plate, far fewer routinely check underneath the free edge.
Now, I get it. It’s easy to skip. Clients are often in a hurry, we’re watching the clock, and if you’re working with a dark gel colour or builder gel, any issues underneath are effectively masked. But skipping this check is like only cleaning your kitchen counters and ignoring the mould in your fridge. Just because you can’t see it doesn’t mean it’s not there.
Let me show you why this matters.
Onycholysis and What It Means for Redoing Artificial Nail Enhancements
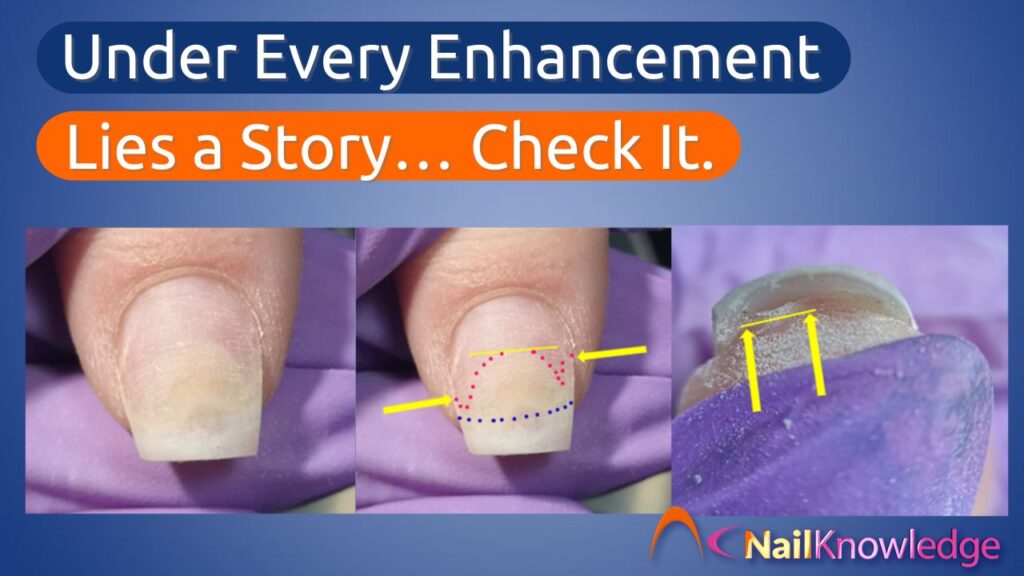
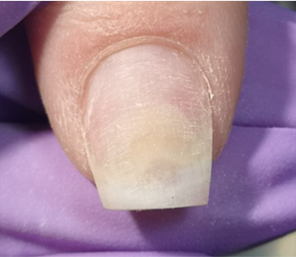
A colleague of mine once discovered significant onycholysis when removing her own artificial nails. Now, she knew her stuff, she just hadn’t realised the lateral nail walls were part of what we call the “guardian seals” of the nail unit. Once removed, it revealed widespread nail plate detachment.
What’s shocking is that the onycholysis had eaten up two-thirds of her nail, something you’d never spot from above. The yellow arrows she marked on the photo showed the detachment spreading right into the lateral nail fold. The nail looked completely normal from the top but was hiding a whole world of trouble beneath.
And guess what? That “world of trouble” becomes a five-star resort for bacteria if left untreated.
I want to show you something: Onycholysis
This is what one of my colleagues saw when she removed her artificial nail product – I forgive her for the missing lateral side walls at the time she didn’t realize they were one of the 4 guardian seals of the nail unit.
- The yellow line shows where the nail plate is attached to the nail bed like it should be.
- The yellow arrows show where the onycholysis ends but also the amount of detached nail plate in the lateral nail fold.
- The pink dots the proximal end of the onycholysis.
- The blue dots where the onychodermal band and the hyponychium should be.
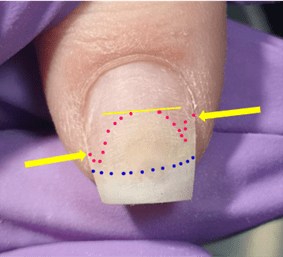
Have a look at this picture of the nail unit from under the free edge. The yellow arrows and line show the detachment of the hyponychium and onychodermal band.

Now imagine if this colleague, was just doing an infill maybe from a dark blue or black hard gel or builder gel polish, no way she would see just how bad the onycholysis is unless she looked behind the free edge. The onycholysis consumes almost 2/3rd of the nail! That’s enough space for a family of bacteria and other mean pathogens to have a vacation in for 6 months!
Missing the Signs? Here’s What Can Happen…
Infections don’t wait for your next appointment. If an area of onycholysis is left unchecked, it can create the perfect moist, dark, and protected environment for bacteria like Pseudomonas Aeruginosa to move in and wreak havoc.
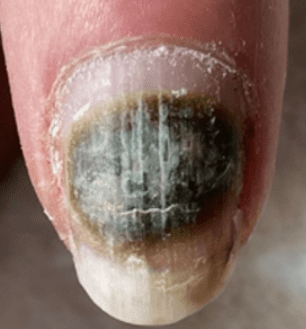

One salon client here in the Netherlands dealt with such an infection for six months, despite following protocols and seeking proper treatment. That’s how long it can take to correct something that may have started out as a tiny patch of lifting or a crack in the product. And no, removing the nail plate wasn’t an option. Those kinds of extreme measures are for medical professionals, not nail techs.
And it’s not just bacteria. Fungal infections like white superficial onychomycosis can also take hold if water gets trapped under damaged enhancements. These often show up as powdery white patches, sometimes brushed off as “just dryness” or over-buffing damage, when in fact, they require completely different care.
When to Pause During Rebalancing Artificial Nail Enhancements
We all want to give clients beautiful nails, but beauty can’t come at the cost of health. If you see signs of infection or nail trauma, stop. Explain your concerns professionally, show them what you see (photos help a ton here), and refer them to a GP or podiatrist if needed.
Sometimes, infections or reactions aren’t your fault. Maybe the client whacked their hand, cracked the product, and let water seep in. Maybe they’ve developed an allergy to an ingredient. That’s not on you. But missing it? Ignoring it? That’s where things go wrong.
Education Is Power – Keep Learning
We don’t live in a static industry. Nail technology, medical knowledge, and hygiene protocols evolve all the time. What you learned five years ago might already be outdated. That’s why ongoing education is not a luxury, it’s a necessity.
When redoing or rebalancing artificial nail enhancements, you’re not just applying a pretty surface. You’re making health checks. You’re being a professional. You’re being a guardian of your client’s natural nail health.
So next time you prep for a refill or remove that last layer of gel, take a breath. Look under the free edge. Take your time. Ask yourself: “Am I seeing everything I need to see?”
Because prevention isn’t just better than cure, it’s the difference between flawless nails and six months of painful, stubborn recovery.
Let’s keep eyes open, keep learning, and above all, keep those nail beds happy and healthy.