• Skip to primary navigation
  • Skip to main content
  • Skip to footer
NailKnowledge

NailKnowledge

  • Courses
  • eBooks
  • eBook Basket
  • Knowledge Base
    • Knowledge Base
    • Ask the Experts
    • Glossary
  • News
  • Blog
  • Gallery
    • Nail Art Gallery
    • Nail Artists
    • Join the Elite
  • Login

General Information

What to Look for When Redoing or Rebalancing Artificial Nail Enhancements

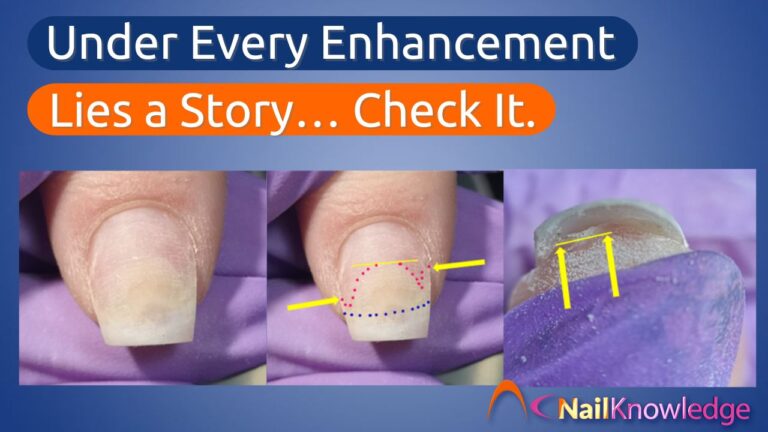
There’s something incredibly satisfying about removing old gel polish or giving artificial nails a good rebalance. It’s like hitting the refresh button on your client’s hands. But here’s a question we should all ask ourselves: Are we really checking everything we need to when redoing or rebalancing artificial nail enhancements? Because if not, we might be missing warning signs that can turn into serious nail health problems.

When you’ve soaked off that old product or filed back for a rebalance, it’s more than just prepping for a new design. It’s also your window of opportunity, your only real chance to check the client’s natural nails for any signs of trouble. And yes, there’s a lot more to see than just a bit of lifting or growth.

Inspecting the Nail Plate When Redoing Artificial Nail Enhancements

We tend to focus on the surface, rightly so. After all, that’s where we apply product, create shape, and show off our work. But when redoing artificial nail enhancements, we must look closely at the natural nail underneath.

Yellowing on the nail plate? That could be a red flag for onycholysis or inner nail plate damage.
Greenish discolouration? Classic sign of the beginning of a bacterial infection, Pseudomonas Aeruginosa is the usual suspect here.
Chalky white patches? That’s potentially white superficial onychomycosis, a type of fungal infection that can easily be mistaken for nothing more than product damage.

Each of these conditions has one thing in common. They are contraindications. That means you should not continue the service without further assessment or referral. But here’s the kicker: they all need to be treated differently, so identifying the right issue matters.

Why You Must Check Under the Free Edge During Nail Rebalancing

Here’s where things get even trickier. While most techs are trained to inspect the surface of the nail plate, far fewer routinely check underneath the free edge.

Now, I get it. It’s easy to skip. Clients are often in a hurry, we’re watching the clock, and if you’re working with a dark gel colour or builder gel, any issues underneath are effectively masked. But skipping this check is like only cleaning your kitchen counters and ignoring the mould in your fridge. Just because you can’t see it doesn’t mean it’s not there.

Let me show you why this matters.

Onycholysis and What It Means for Redoing Artificial Nail Enhancements

A colleague of mine once discovered significant onycholysis when removing her own artificial nails. Now, she knew her stuff, she just hadn’t realised the lateral nail walls were part of what we call the “guardian seals” of the nail unit. Once removed, it revealed widespread nail plate detachment.

What’s shocking is that the onycholysis had eaten up two-thirds of her nail, something you’d never spot from above. The yellow arrows she marked on the photo showed the detachment spreading right into the lateral nail fold. The nail looked completely normal from the top but was hiding a whole world of trouble beneath.

And guess what? That “world of trouble” becomes a five-star resort for bacteria if left untreated.

I want to show you something: Onycholysis

This is what one of my colleagues saw when she removed her artificial nail product – I forgive her for the missing lateral side walls at the time she didn’t realize they were one of the 4 guardian seals of the nail unit.

  • The yellow line shows where the nail plate is attached to the nail bed like it should be.
  • The yellow arrows show where the onycholysis ends but also the amount of detached nail plate in the lateral nail fold.
  • The pink dots the proximal end of the onycholysis.
  • The blue dots where the onychodermal band and the hyponychium should be.
Onycholysis
Onycholysis – A detailed Look

Have a look at this picture of the nail unit from under the free edge. The yellow arrows and line show the detachment of the hyponychium and onychodermal band.

Onycholysis behind the free edge.

Now imagine if this colleague, was just doing an infill maybe from a dark blue or black hard gel or builder gel polish, no way she would see just how bad the onycholysis is unless she looked behind the free edge. The onycholysis consumes almost 2/3rd of the nail! That’s enough space for a family of bacteria and other mean pathogens to have a vacation in for 6 months!

Missing the Signs? Here’s What Can Happen…

Infections don’t wait for your next appointment. If an area of onycholysis is left unchecked, it can create the perfect moist, dark, and protected environment for bacteria like Pseudomonas Aeruginosa to move in and wreak havoc.

Pseudomonas Aeruginosa bacterial infection
Pseudomonas Aeruginosa bacterial infection – almost resolved

One salon client here in the Netherlands dealt with such an infection for six months, despite following protocols and seeking proper treatment. That’s how long it can take to correct something that may have started out as a tiny patch of lifting or a crack in the product. And no, removing the nail plate wasn’t an option. Those kinds of extreme measures are for medical professionals, not nail techs.

And it’s not just bacteria. Fungal infections like white superficial onychomycosis can also take hold if water gets trapped under damaged enhancements. These often show up as powdery white patches, sometimes brushed off as “just dryness” or over-buffing damage, when in fact, they require completely different care.

White Superficial Onychomycosis

When to Pause During Rebalancing Artificial Nail Enhancements

We all want to give clients beautiful nails, but beauty can’t come at the cost of health. If you see signs of infection or nail trauma, stop. Explain your concerns professionally, show them what you see (photos help a ton here), and refer them to a GP or podiatrist if needed.

Sometimes, infections or reactions aren’t your fault. Maybe the client whacked their hand, cracked the product, and let water seep in. Maybe they’ve developed an allergy to an ingredient. That’s not on you. But missing it? Ignoring it? That’s where things go wrong.

Education Is Power – Keep Learning

We don’t live in a static industry. Nail technology, medical knowledge, and hygiene protocols evolve all the time. What you learned five years ago might already be outdated. That’s why ongoing education is not a luxury, it’s a necessity.

When redoing or rebalancing artificial nail enhancements, you’re not just applying a pretty surface. You’re making health checks. You’re being a professional. You’re being a guardian of your client’s natural nail health.

So next time you prep for a refill or remove that last layer of gel, take a breath. Look under the free edge. Take your time. Ask yourself: “Am I seeing everything I need to see?”

Because prevention isn’t just better than cure, it’s the difference between flawless nails and six months of painful, stubborn recovery.

Let’s keep eyes open, keep learning, and above all, keep those nail beds happy and healthy.

Filed Under: DIY Nails Gone Wrong, General Information

Nail Psoriasis Symptoms in Clients

How to Identify Nail Psoriasis Symptoms in Clients with Confidence and Care

As nail professionals, we often spend more time examining our clients’ nails than they do themselves. Whether you’re prepping for a manicure, applying gel, or giving a hand massage, you’re in a unique position to notice early warning signs of certain conditions, like nail psoriasis. It’s not uncommon for clients to be completely unaware of what’s happening under the polish. Spotting potential nail psoriasis symptoms in clients isn’t about diagnosing but about being observant and informed so you can offer the best advice and ensure their wellbeing.

So how do you recognise the signs of nail psoriasis without alarming your client, and when should you recommend they speak to a healthcare provider? Let’s explore the clues, what they mean, and how to navigate the conversation professionally.

Recognising the Visual Clues of Nail Psoriasis in the Salon

Nail psoriasis can be tricky to spot because it shares symptoms with other nail conditions. Most commonly, it appears in individuals who already have psoriasis on their skin, but it’s not limited to them. Interestingly, only about 5 percent of people with psoriasis experience symptoms limited to the nail plate. However, those with psoriatic arthritis, especially in fingers and toes, often show signs in their nails as well.

This condition isn’t contagious. It doesn’t come from bacteria, fungi, or any outside source. Instead, it’s rooted in the immune system and often runs in families. That means it’s not a hygiene issue, which is an important distinction to make when explaining it to a client.

You’re not expected to identify medical issues. But spotting changes in the nails helps you offer guidance and shows your professionalism.

Changes in Colour and Surface Texture to Watch For

When scanning your client’s nails during a service, there are a few tell-tale signs that may point to nail psoriasis symptoms in clients. One of the most recognisable is the “salmon patch.” These look like tiny drops of oil or blood trapped under the nail plate and tend to appear pinkish or reddish in tone.

Other discolouration might include patches of green, yellow, or brown. These could be mistaken for fungal infections or bruising, but if seen in combination with other symptoms, they may be signs of psoriasis.

Surface texture is another clue. The nail plate might develop small pits or indentations, like pinpricks scattered across the surface. These pits can be random or neatly aligned, giving the nails an unusual, rough appearance even though they haven’t been filed.

In more advanced cases, the nail may become thicker, appear chalky underneath, or start crumbling at the free edge. This brittleness is a result of weakened nail structure, not neglect.

Nail Separation, Bleeding and Tenderness

If you notice the nail lifting from the nail bed, beginning at the free edge and pulling back toward the cuticle, this condition is known as onycholysis. It’s a common issue for those with nail psoriasis and can open the door to secondary infections.

You might also see splinter haemorrhages, tiny black lines running in the direction of nail growth. These are caused by broken capillaries in the nail bed and are usually harmless, but their presence along with other signs strengthens the case for referring the client to a medical professional.

Redness in the lunula (the half-moon at the base of the nail) and inflammation around the nail folds (known as paronychia) can also be part of the picture. These symptoms may make the nails feel sore or tender, which the client might casually mention in conversation without realising it’s a sign of something more.

Communicating Your Concerns Without Alarm

When you’re faced with several of these symptoms at once, it’s wise to gently suggest your client consult a dermatologist or podiatrist. The key here is tone. Avoid sounding alarmed or overly clinical. Instead, speak in calm, neutral language that keeps the focus on their health.

For example, you could say: “I’ve noticed a few changes in your nails that I think are worth showing to a dermatologist. It’s nothing to panic about, but it could be something like nail psoriasis, and they’ll be able to give you a clear answer.”

This approach respects the client, keeps their dignity intact, and shows that you’re looking out for their overall wellbeing, not just their manicure.

Safe Practices for Nail Psoriasis in the Salon Environment

Despite its appearance, nail psoriasis is not caused by an infection, and it cannot be passed from one person to another. That means it’s completely safe to carry out nail services, as long as the client is comfortable and the nail bed is not open or actively inflamed.

In fact, well-applied artificial nail coatings can help protect the nail from further trauma. UV gel manicures, acrylic overlays, and other professional coatings are not harmful to the condition. Just be sure the nail isn’t lifting or damaged to the point of exposing the nail bed, as that could invite irritation or infection.

Everyday Nail Care Advice for Clients with Nail Psoriasis Symptoms

Although there is no cure, many clients benefit from practical, everyday care tips to manage nail psoriasis. Encourage them to keep nails short and the free edge smoothly filed. Suggest wearing gloves while doing housework or gardening, especially during colder months. A high-quality skin conditioner can help prevent cracking and dryness, which often aggravate symptoms.

Comfortable, well-fitting shoes are also important, particularly for those who exercise regularly. For clients open to medical treatment, let them know there are therapies available, from topical creams to injections and light treatments. This may offer significant relief, even if results take time to appear.

When to Refer Your Client

Refer to a podiatrist if your client has:

  • Pain, swelling, bleeding, or tenderness around the nail
  • Nails that smell bad or appear infected
  • Symptoms that aren’t improving after self-treatment
  • Changes in multiple nails, especially if they look symmetrical
  • A personal or family history of psoriasis or skin conditions
  • Any unusual or concerning changes you’re unsure about

Think your client has a fungal nail infection? It might actually be nail psoriasis. Learn how to spot the difference, avoid misdiagnosis, and protect salon hygiene.

Final Thoughts on Spotting Nail Psoriasis Symptoms in Clients

As a beauty professional, you’re not there to diagnose medical conditions, but your role can still be powerful. By being informed about nail psoriasis symptoms in clients, you’re better equipped to support them with empathy, professionalism and the right advice.

Clients trust you not just for beautiful nails, but for your expertise. When you notice changes in nail texture, colour, or structure, you have the opportunity to guide them toward the care they might need, without judgment or alarm. That’s a mark of true professionalism.

Fungal Infection or Nail Psoriasis? Here’s How to Tell the Difference

Think your client has a fungal nail infection? It might actually be nail psoriasis. Learn how to spot the difference, avoid misdiagnosis, and protect salon hygiene.

Filed Under: General Information, Nail Conditions, Nail Services

Is the Lemon Juice Nail Treatment Worth It?

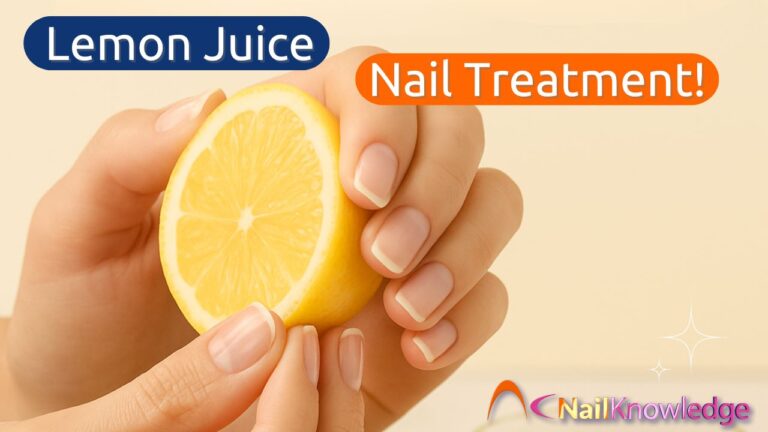
A Closer Look at The Lemon Juice Nail Treatment Trend

We’ve all heard it: when life gives you lemons, use them on your nails. Okay, maybe not quite that phrase, but the idea of a lemon juice nail treatment has floated around beauty blogs and Pinterest boards for years. It’s one of those home remedies that promises brighter, stronger, healthier nails with ingredients from your kitchen. Sounds perfect, right?

But not so fast. While the allure of natural nail care is tempting, there’s a flip side to this citrusy trick that not everyone talks about. So, before you start dunking your fingers in lemon juice, let’s take a deeper dive into what this treatment actually does and whether it’s really worth the squeeze.

What Is the Lemon Juice Nail Treatment All About?

Touted as a multi-purpose fix for stained, brittle, or fungal-prone nails, the lemon juice nail treatment is exactly what it sounds like: applying fresh lemon juice to your nails and cuticles, either directly, mixed with olive oil, or as a soak.

The appeal lies in the simplicity. Vitamin C? Check. Natural antiseptic? Yup. A kitchen staple that smells great? Absolutely. And, according to DIY devotees, it’s supposed to:

  • Remove yellow stains or discolouration from nails
  • Brighten the overall appearance of the nail plate
  • Strengthen weak nails with vitamin C
  • Fight minor fungal infections thanks to citric acid

It’s easy to see why people give it a try. Plus, compared to pricey nail serums and treatments, it’s incredibly low-cost.

Does It Actually Work?

Sort of. Lemon juice can help lift surface stains, like those from nail polish or smoking, thanks to its mild bleaching effect. Think of it like a whitening toothpaste, but for your nails. Used sparingly, especially when mixed with olive oil, it may even offer a bit of hydration and shine.

There’s also something satisfying about rubbing a slice of lemon across your fingertips. It feels clean, zesty, refreshing. And sure, vitamin C is an essential nutrient that contributes to collagen production, which plays a role in nail strength.

But here’s the kicker. Just because vitamin C is in lemon juice doesn’t mean your nails will soak it up and start growing like wildflowers. The actual amount absorbed through the nail plate is likely minimal, and the benefit is more anecdotal than scientifically proven.

The Hidden Dangers of DIY Citrus Nail Care

This is where things get interesting. While the lemon juice nail treatment might seem harmless, there’s a surprising danger that comes with it, especially if you’re a sun-lover.

Have you ever heard of phytophotodermatitis? It sounds like a spell from Harry Potter, but it’s actually a very real and unpleasant skin reaction. Here’s how it works. Citrus juices like lemon or lime can linger on your skin. If you then go out into the sun, certain compounds in the juice chemically react with UV light, causing redness, streaks, rashes, or even painful blisters.

These reactions can take a day or two to show up, often looking like sunburn, eczema, or even second-degree burns. And get this. They can last for weeks. Not exactly the glowing beauty look you were going for.

Nail professionals and dermatologists warn that even small, raw amounts of lemon juice applied to the skin, especially around the nails and cuticles, can absorb and trigger this effect. So while you’re soaking your nails for beauty, you might be setting yourself up for a seriously uncomfortable experience if you go outdoors too soon after.

Is a Natural Lemon Nail Remedy Really Worth It?

It depends on your goal and your sun exposure. If you’re indoors, trying to gently remove nail stains before a fresh coat of polish, a one-time lemon juice rub might be fine. Especially if you rinse thoroughly and moisturise afterwards.

But if you’re looking for something to strengthen your nails or treat ongoing issues like fungus or brittleness, you’re probably better off using treatments specifically designed for that purpose. Ones that don’t risk turning your skin into a rashy science experiment.

And definitely, definitely don’t sit by a sunny window or go outside right after a lemon juice soak. Trust us, those streaky rashes are not worth it.

Safer Nail Brightening and Strengthening Alternatives

If the lemon juice nail treatment doesn’t quite feel safe anymore, don’t worry. There are safer, more effective ways to give your nails the TLC they deserve:

  • Use a nail whitening pencil for cosmetic brightening
  • Moisturise with cuticle oils that contain jojoba or vitamin E
  • Exfoliate gently with a nail buffer to remove surface stains

The best part? These methods won’t leave you nervously avoiding sunlight like a vampire in July.

Our Verdict on Using Lemon Juice for Nail Health

Home remedies can feel comforting. There’s something empowering about using natural, familiar ingredients to care for ourselves. But it’s important to remember that “natural” doesn’t always mean safe or effective.

The lemon juice nail treatment might seem like a harmless beauty hack, but between the risk of phytophotodermatitis and the lack of strong scientific backing, it’s probably better kept as a once-in-a-while experiment, not a go-to nail routine.

Sometimes, it really is best to leave the lemons for your tea.

Filed Under: General Information, Myth Busting

Pinched Nail After Gel Removal?

If you’ve ever looked down at your nails and noticed one of them narrowing oddly at the tip, sometimes even feeling a little tight or uncomfortable, you’re not alone. A question that comes up frequently in salons and online forums is: “What is this strange shape happening to my nail?” More often than not, it’s something called a pinched nail, and it’s especially common after gel removal.

This seemingly small change can feel alarming, particularly if it’s a new development. The good news? It’s usually reversible once you understand the underlying causes — and that’s exactly what we’re unpacking today. Whether it appeared suddenly or was masked by a product like builder gel or BIAB, a pinched nail after gel removal is your nail’s way of telling you it needs a little extra care.

What Exactly Is a Pinched Nail?

A pinched nail refers to a nail plate that appears to taper unnaturally at the free edge, creating a tight, sometimes concave shape that hugs the fingertip more than usual. It can look like the nail is being squeezed from the sides, hence the term pinched. Some people describe it as a claw-like or “sucked in” appearance at the tip, while others notice discomfort or even slight pressure under the nail.

It’s not always a cause for panic, but it is a sign that your nails are trying to tell you something.

Why You Often See a Pinched Nail After Gel Removal

This might sound familiar: you soak off your gel, buff lightly, and suddenly notice your nail looks… different. Tighter. Narrower at the tip. That’s the pinched nail showing up, and it’s incredibly common right after removing gel polish or gel overlays.

Why? Because gel products, especially those with a rigid structure like builder gels or hard gels, bond closely with the nail.

Removing them involves a mix of acetone and physical filing, two things that, when paired, can wreak havoc on the nail’s natural moisture and structure. Acetone shrinks and dehydrates the nail plate, while filing thins it, especially around the edges. This combo weakens the sidewalls, and without that support, the nail can start to collapse inward, mimicking the look of a pinched nail. Even if you’ve been super careful, small bits of overfiling across several appointments can add up. And the thinner the free edge becomes, the more prone it is to curling or “pinching” once the gel is gone and the nail is left unsupported.

This is why many people notice a pinched nail only after gel is removed — not because it appeared suddenly, but because the gel had been masking the shape change all along.

How Gel Shrinkage and Hyponychium Response Can Alter Nail Shape

Behind the free edge of the nail plate lies the hyponychium, one of the important guardian seals, what you may not be aware of is a lot of BIAB’s or Builder Gels shrink when they cure, how much they shrink depends on the ingredients, but know that they all do to some extent and if you have filed into the lateral nail folds and weakened the nail plate the structure of the nail is compromised and the nail plate will change shape. The other part of the problem is due to the pressure on the free edge the hyponychium will be irritated and part of its defense when its irritated is to call in the troops and thicken a little, causing more pressure on the underside of the free edge. How do we know this? During the Covid-19 pandemic a lot of our consumers removed their own nail product as this couldn’t be infilled, so 2 things happened:

  1. They filled too much in an effort to remove the product
  2. They couldn’t get their nails redone and the hyponychium had time to recover.

Fig 3a: Slightly raised hyponychium

Fig 3b: Three months into lockdown – the hyponychium is relaxed the nail plate is not damaged by filing into the lateral nail folds or roughing up the nail plate before reapplying the Gel.

Common Causes of a Pinched Nail

Now that we’ve tackled the gel connection, let’s look at other factors that can trigger or worsen a pinched nail:

1. Overfiling the Sidewalls

Possibly the biggest offender. Over time, repeated filing — even gentle — can thin the sidewalls, especially when removing enhancements like Plexigel. Once those side areas lose structure, the nail’s free edge is left vulnerable and can start curling inwards as it grows.

2. Dehydration from Acetone Soaks

Acetone, while great for product removal, pulls moisture from both the nail plate and surrounding skin. If you’ve ever felt that chalky, tight sensation post-soak, you know the feeling. Prolonged exposure, especially if followed by buffing, can temporarily (or permanently) warp the nail shape.

3. Natural Anatomy or Repetitive Trauma

Some people are naturally more prone to a pinched nail due to their nail bed shape. But if it’s something you’ve only recently noticed, look at lifestyle habits. Typing, picking, tapping, or even frequent exposure to pressure under the free edge can distort growth over time.

4. Hyponychium Changes

The hyponychium, the sensitive skin under the free edge, can shift or recede if irritated. This may happen due to overfiling, chemical exposure, gel shrinkage during curing or friction. When this skin detaches or becomes inflamed, the nail may grow in tighter, adding to that pinched look.

How to Care for and Prevent a Pinched Nail

If you suspect you’re dealing with a pinched nail, don’t panic. It’s often reversible with a little care and patience.

1. Take a Break

Step away from enhancements and give your nails a chance to recover. A month without gels or removals will allow the nail plate to grow normally and recover its natural shape.

2. Rehydrate, Rehydrate, Rehydrate

Nails need moisture just like skin. Apply a good quality nail & skin oil  behind the free edge at least 4 times a day. Rinse your hands a few times a day with an Allantoïne & Ureum rinse, this will help recondition the nail and surrounding tissue, and finish with a little of your favorite lotion, if it contains Allantoïne and Ureum that’s an added bonus and your nails and nail area will love you for it.

3. Minimise Further Trauma

During this recovery period, Keep nails trimmed short to prevent catching or bending. Be gentle when typing, opening containers, or using your nails as tools (just don’t!).

4. Avoid Filing Thin Areas

Skip the sidewalls entirely when buffing or shaping for now. Focus only on gentle surface smoothing if needed — and avoid pressure.

5. Monitor for Patterns

If it’s spreading to other nails or worsening, it could signal an underlying health or nutritional issue. Keep an eye out and consider speaking to a pro if you’re concerned.

Final Thoughts

A pinched nail might start as a subtle cosmetic change, but it’s often a message from your body or your habits, that something needs adjusting. Whether it’s overfiling, dehydration, trauma, product shrinkage or just the aftermath of gel removal, paying attention early can help you course-correct and avoid long-term damage.

The silver lining?

Nails are resilient. With a good recovery plan, care, and a few small tweaks to your routine, most pinched nails can bounce back to full strength, and beauty.

Filed Under: General Information, Nail Conditions

Wrinkling and Curing Issues on Thumb Nails

When it comes to achieving flawless nail finishes, the thumbs can often present unique challenges. This article explores the common issues of wrinkling and incomplete curing that many encounter with their thumb nails, particularly focusing on the application process and the role of nail curing equipment.

The Role of Uneven Application for Wrinkling Nails

One of the primary reasons for wrinkling and incomplete curing on the thumbs is the uneven application of the base coat. Thumbs are more prone to this issue due to their wider and flatter surface area compared to other fingers, which can lead to a thicker or uneven layer of product. When the base coat is applied too thickly, especially on the sides of the thumbs, it can prevent the curing light from effectively polymerising the entire layer. This incomplete curing results in a wrinkled appearance and can affect the durability of the nail finish.

Best Practices for Base Coat Application on Thumbs

To combat these issues, it is crucial to adopt a targeted approach when applying the base coat to the thumbs. Here are a few tips:

  • Apply Thinly: Ensure a thin and even application across the entire nail, paying particular attention to the sides where the product tends to accumulate.
  • Separate Application: Consider applying the base coat separately to the thumbs, which allows for more focused attention and control over the thickness.
  • Curing Techniques: Properly position your thumbs under the curing light, ensuring that all parts of the nail are adequately exposed.

The Benefits of a Mirrored Base in Nail Curing

A mirrored base in a nail curing lamp is designed to enhance the effectiveness of the curing process. Here’s how it works:

  • Reflective Surface: The mirrored base helps reflect UV or LED light back onto the nail, particularly targeting hard-to-reach areas like the sides and tips.
  • Even Curing: This reflection ensures more uniform exposure to the curing light, potentially reducing issues like wrinkling and incomplete curing.

Is a Mirrored Base Necessary?

Adjusting your base coat application technique should be your first step, and a mirrored base can serve as an additional aid. Its effectiveness, however, largely depends on the type of curing lamp you use and the specific challenges you face with your nail treatments. If you continue to experience issues despite optimising your application technique, incorporating a mirrored base might be worth considering.

Final Recommendations for Wrinkling on Nails

For those struggling with wrinkling and incomplete curing on their thumbs, focus initially on perfecting your base coat application. This involves applying thin, even layers and ensuring proper exposure to curing light. If problems persist, then exploring advanced equipment options like a curing lamp with a mirrored base could provide the solution you need to achieve perfect, long-lasting nail finishes.

By understanding these key aspects and making a few strategic adjustments, you can greatly improve the appearance and durability of your nail enhancements, especially on challenging areas like the thumbs.

Filed Under: General Information, Nail Services

DIY Gel Nails Gone Wrong

Avoid Damage and Allergic Reactions with Expert Tips

Nail enhancements can be beautiful, but what happens when your nail routine causes more harm than good?

The nail industry is booming, with countless enthusiasts turning to DIY nail kits at home. However, a recent social media post from Amy Brown Meyer highlights the potential risks of improper nail care. Amy shared her concerns about irritation after a home gel manicure, sparking a detailed and eye-opening response from Tracy Anne Shelverton, our nail expert.

Tracy’s response is a masterclass in understanding nail and skin health, emphasizing how improper techniques like overfiling or trimming (too much) skin can compromise the protective skin layers around your nails. This not only leads to irritation and swelling but opens the door to potential allergic reactions and or irritation caused by the chemicals in artificial nail products.

How DIY Gel Nails Can Damage Your Nail Health

According to Tracy, the skin around your nails are part of the guardian seals that protect your nails and nail units from pathogens and allergens. However, improper techniques like overfiling, aggressive trimming, or using tools incorrectly can weaken this barrier.

When this happens:

  • The skin becomes irritated, leading to redness, swelling, and immune responses.
  • Allergens from uncured gel products can penetrate the damaged skin layers, potentially triggering permanent allergic reactions.

Without the protective skin barrier, the compounds in artificial nail products especially those containing acrylates, can easily enter the body, causing both short-term irritation and long-term sensitivity.

Allergic Reactions to Gel Nails: Risks and Long-Term Impacts

One alarming fact is that allergic reactions to nail products can have implications beyond your manicure. Tracy warns that the same compounds found in all artificial nail products that need to harden are also used in medical adhesives and dental cement.

What this means for you:

  • Developing an allergy now could make future medical treatments, such as orthopedic surgery or dental work, more complicated.
  • Allergic reactions can lead to swelling, itching, redness, and even chronic sensitivity to related chemicals.

Steps to Protect Your Nails and Skin

If you love doing your nails at home, there are ways to stay safe and protect your nail health:

  • Respect Your Skin Barrier: Avoid overfiling or trimming the nail folds (the skin around your nails).
  • Avoid Skin Contact: Ensure artificial nail products, especially uncured gels, do not touch your skin during application.
  • Give Skin Time to Heal: If you notice irritation or redness, stop using products and allow at least three months for your skin to recover.
  • Consider Testing for Allergies: If you suspect an allergic reaction, consult a dermatologist for patch testing to identify allergens.
  • Educate Yourself: Invest in proper training to learn safe nail application techniques. Courses and eBooks like those offered by NailKnowledge can help you master the art of nail enhancements without compromising your health.

A Lesson for Nail Enthusiasts and Professionals

The story of Amy’s irritated nails is a powerful reminder that beauty should never come at the cost of health. Whether you’re a DIY enthusiast or a professional nail technician, understanding the science behind nails, artificial nail products and skin is crucial for safe and beautiful results.

FAQs About Gel Nails and Allergic Reactions

Q: Can gel nails cause allergic reactions?
Yes, gel nails contain acrylates, which are allergens. If these come into contact with your skin, especially if the skin barrier is compromised, they can trigger allergic reactions like redness, swelling, or itching.

Q: How can I prevent irritation from DIY gel nails?
Avoid overfiling your nails or trimming the skin. Make sure uncured gel products do not touch your skin during application.

Q: What should I do if I experience irritation after a gel manicure?
Stop using all nail products immediately and allow your skin to heal. Consult a professional if symptoms persist, and consider allergy testing if necessary.

Want to Learn More?

Unlock your full potential with the NailKnowledge Complete Bundle, the ultimate resource for nail enthusiasts and professionals alike.

With lifetime access to everything NailKnowledge has to offer, you’ll gain expert guidance and tools to achieve salon-quality nails while keeping your hands healthy and beautiful.

What’s Included in the NailKnowledge Complete Bundle?

  • 3 Comprehensive Courses
  • 18 Lessons
  • 35 Knowledge Points
  • 6 Industry-Leading eBooks
  • Your own Artist/Salon Profile to showcase your expertise

Whether you’re just starting out or looking to deepen your expertise, this one-time purchase equips you with all the tools, insights, and resources to elevate your nail skills.

No ongoing fees, just a lifetime of knowledge.

Nailknowledge complete bundle

Protect your nails, protect your health, and keep your hands looking their best, the right way.

Filed Under: DIY Nails Gone Wrong, General Information, Health and Safety, Nail Conditions

  • Page 1
  • Page 2
  • Page 3
  • Interim pages omitted …
  • Page 30
  • Go to Next Page »

Level Up Your Nail Insights

Join our Newsletter!
SUBSCRIBE...

Copyright © NailKnowledge

NailKnowledge

  • eBooks
  • About us
  • Courses
  • News
  • Blog
  • Newsletter
  • Glossary

Policies

  • Privacy Page
  • Terms & Conditions
  • Cookie Policy

Support

  • Contact Us
  • Ask the Experts
  • System Support
  • FAQs
English
English
Portuguese Spanish Vietnamese