The simplest way to do this is to describe and explain the four stages of UV curing. This information applies to all artificial nails, including UV gel manicures and two-part monomer liquids and polymer powders. The first thing you should know is that the curing reactions happen very quickly at first, then slow down dramatically toward the end of the curing cycle. Also, curing and polymerization mean the same thing: each molecule that makes up the reactive ingredients is linked together to form chains which grow longer and longer over time. With that information, let’s look at Stage 1 of the curing process.

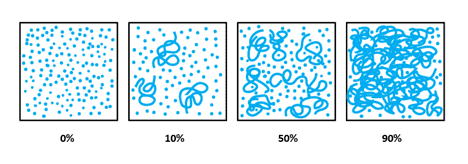
Image 2: Demonstrates the process of polymerization; monomers joining to become part of the lengthening polymer chains. The first image is 100% monomer, and 0% polymer, whereas the final image represents 10% monomer and 90% polymer.
Stage 1: Initial Set or Thicken Stage of UV Curing Process for Artificial Nails
Stage 1 occurs when the product sets or thickens. After 10-15 seconds under a UV nail lamp, about 25% of the UV reactive molecules in the formula will chemically link together to create very short chains. In the initial stages, the first short chains that form begin to tangle together and the product becomes very stringy which is due to thickening.
This short pre-cure is sometimes used to “lock” in a smile line so that the edge doesn’t become blurred when a clear or pink UV gel is added to the nail plate. This is much like when many long hairs tangle to form a knot. At this stage, the UV gel is only about ¼ cured.
Stage 2: Hardening Phase of UV Curing Process for Artificial Nails
Stage 2 occurs when the UV gel becomes at least 50% cured, which is easy to spot. When 50% of the UV reactive molecules link together the UV gel becomes so thick that its surface will harden enough to be shaped with a file. It is VERY important to understand that at this point, the UV gel is only half cured.
The hardening of a UV gel does NOT mean it is properly cured. This is one of the most important misconceptions in the nail industry and it even fools many manufacturers who don’t understand the science behind the curing process.
Stage 3: Proper Cure Phase of UV Curing Process for Artificial Nails
Stage 3 is when proper cure is supposed to occur, yet doesn’t always happen. During Stage 3, if proper cure is achieved, then the UV gel is cured enough so that the nail coating has the strength and durability needed to perform as intended without service breakdown.
You can NOT “see” or “feel” when proper cure occurs, which is why it is so important to follow manufacturer’s directions which will help to ensure proper cure. Proper cure is typically reached when about 90% cure, in other words, when about 90% of the UV reactive ingredients are chemically joined together into a strong net-like structure. It is a myth that UV gels cure to 100%. No way! UV gels never 100% cure, nor is this necessary to achieve a proper cure.
However, when significantly below 90%, the coating is under-cured. Under curing leads to service breakdown, discoloration or unusual staining of the nail coating, but more importantly, this can cause nail professionals and/or clients to develop skin allergies to unreacted ingredients trapped in the nail coatings, as well as their dust and filings. This is why proper curing is so important to achieve- for the protection of the nail technician and clients.
Stage 4: Post-Salon Curing Phase for Artificial Nails
Stage 4 of the curing occurs “after” the client leaves the salon. By now, the curing process has slowed to a crawl, so only about 5-7% additional curing happens over the next few weeks. Curing slows to a crawl because once the nail coating has hardened, it becomes very difficult for unreacted ingredients to move around and find and join the ends of the growing polymer chains.
UV-A energy drives these chemical reactions for UV curing gels, but in two-part monomer liquids and polymer powders, the heat of the room and the warmth of the client’s hand provide all the energy needed to drive polymerization. Therefore, the four stages of curing apply to all types of nail products which cure or polymerize, including adhesives, nail wraps and so-called dip systems. In fact, the only exceptions to this process are traditional nail polishes, since they harden by evaporation of solvents and do not cure by polymerization.


