Nail Product lifting, in the context of nail care, refers to the separation or detachment of nail products, such as acrylic or gel enhancements, from the natural nail. This issue occurs when the applied nail product loses its adhesion to the natural nail, leading to gaps between the product and the natural nail or even complete detachment.
Product lifting can manifest in various ways, ranging from subtle gaps at the back of the nail (PNF) to extensive lifting of the entire nail enhancement. It can be a frustrating and disheartening experience for both clients and nail technicians, as it undermines the efforts put into creating beautiful and durable nail designs.
This phenomenon can be caused by a combination of factors, including improper nail preparation, incorrect application techniques, curing product that is touching the skin, allergic reactions to the products, and external environmental influences.
Understanding the causes of Nail product lifting is crucial for preventing its occurrence and effectively addressing it when it does happen.
In the following sections, we will explore the factors that contribute to product lifting, the common signs and symptoms to look out for, and the steps to take in order to prevent and manage this issue, ensuring that nail enhancements remain stunning and long-lasting.
Understanding Nail Product Lifting
To effectively address and prevent product lifting in nail enhancements, it’s essential to grasp the underlying mechanics and contributing factors. By gaining a deeper understanding of why product lifting occurs, nail technicians can implement strategies to enhance adhesion and provide clients with enduring, flawless nails.
What is Nail Product Lifting?
Product lifting occurs when the bond between the nail enhancement product (such as acrylic, gel, gelpolish or dip powder) and the natural nail bed weakens or breaks. This separation leads to gaps, air pockets, or complete detachment of the enhancement from the natural nail. Understanding the root causes of product lifting is pivotal in devising preventive measures and corrective actions.
Factors Contributing to Nail Product Lifting:
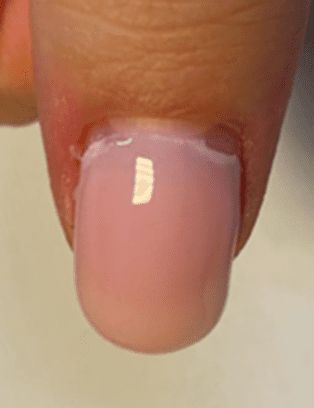
Touching any of the skin around the nail plate during product application This is one of the main problems we see, in the salon and at home, this will always cause ‘lifting’ because the nail plate is in perpetual motion 24/7 and the skin moves in the opposite direction, it sloofs off in a vertical direction this stops the product being sealed on the nail plate, water & oils get underneath and the nail enhancement lifts off of the nail plate, this tempts you or your client to pick at it and this in turn creates the perfect environment for pathogens to settle and reproduce and the recovery of that nail can take months!
Several Other Factors can Contribute to Nail Product Lifting
- Inadequate Nail Preparation: Failing to properly prepare the natural nail by cleaning, dehydrating, and removing excess oils can hinder adhesion.
- Incorrect Application Techniques: Applying nail products too thickly, unevenly, or in a rushed manner can lead to trapped air, poor adhesion, and eventual lifting.
- Allergic Reactions: Some clients might be allergic to certain chemicals present in nail products, causing irritation and lifting due to their body’s immune response.
- Hands in Water Using a hard nail products on weak nails that are always in water is detrimental to product adhesion because the nail plate is full of water it swells up & when this water evaporates the nail plate shrinks – this puts the product under continuous pressure –
- Environmental Factors: Exposure to moisture, humidity, or other external elements during or after application can compromise the bond between the enhancement and the natural nail.
- Nail Shape and Length: Nails with extreme curvature or excessive length can experience increased stress on the enhancement, leading to lifting.
Differentiating Product Lifting from Other Issues
It’s important to distinguish product lifting from other nail-related concerns, such as chipping, peeling, or breakage. Product lifting specifically refers to the detachment of the enhancement from the nail bed, while other issues might involve issues with the enhancement itself or the natural nail structure.
By comprehending these aspects, nail technicians can implement preventive strategies during the nail preparation and application processes. The subsequent sections of this article will delve deeper into recognizing the signs of product lifting, understanding its causes, and exploring techniques to prevent and manage it effectively.
Nail Product lifting – Sounds Simple Enough, Right?
But what causes it?
- Cuticle on the nail plate
- Oil or dirt on the nail plate
- Recontamination of nail plate after cleansing
- Excessive use of primer
- Incorrect use of base coat
- Uncured product
- Unstable nail plate
a. nail biter
b. nail plate filed too thin - Nail biters
a. Insufficient nail plate to place product
b. Using tips - Incorrect size and fit of artificial nail tips
a. Old glue - Incorrect form placement
a. Flat nail, curved form placement
b. Curved nail, flat form placement - Product touching the skin during application
- Incorrect mix ratio L&P
a. Uneven application
i. Leaving doorsteps at the PNF
ii. Product running into the lateral nail folds - Not using the right system for the specific nail type
- Pocket lifting
a. Trauma
b. Pinching
c. Nail plate weakness - Nail plate affected by Hyperhidrosis (Commonly affected areas include the: armpits. palms of your hands, possibly nail units)
- Placing product underneath the eponychium (after excessive efile manicure)
- Mixing systems
Let’s have a Look at them in More Detail
Cuticle on the nail plate
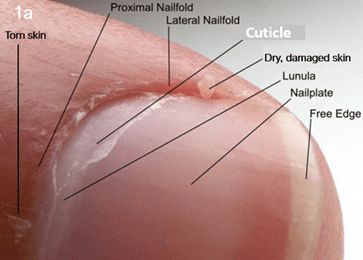
The cuticle is made of non-living elastic tissue & gets stuck onto the nail plate cells as they come through the eponychium. It is one of the four guardian seals. It protects the nail matrix from pathogens that we come across in our daily lives, and that’s a good thing. However, when it comes to our artificial nail products, it can cause real problems. We need to remove it with care! It doesn’t need aggressive removal with a drill bit rotating at 20.000 RPM. If you think that’s ok, try it on the bonnet of your neighbor’s (new) car, and see what happens! Use your favorite good-quality nail oil & a curette, and you’re done in a couple of minutes.
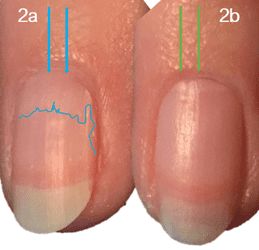
Figure 2a shows a nail plate with cuticle on. There is no light reflection in the cuticle. We all work with lights so seeing it should be no problem. If you can’t see it, buy a loupe or some glasses 😊
Figure 2b shows a nail plate without cuticle – the light reflects through the whole length of the nail.
Oil, minerals, or dirt (still) on the nail plate
During the Covid-19 lockdowns, we were all thrilled that we could go back to work. In many countries, groups of nail experts gave up their time for free to help salons to find ways to work following safe practices. Hygiene practice was high.
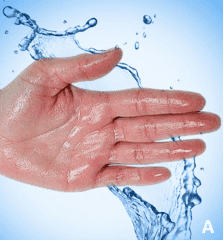
Washing hands with soap & water is one of the most effective ways to remove oil, minerals, and dirt from hands (feet) and nails. It takes almost no time at all – we should always do it, especially at the start of our service.
When you have finished removing the cuticle, and shaped the free edge with your file, let your client wash their hands again with soap, water, and a soft nail brush, dry them well, and continue with your favorite nail plate cleanser. 2 minutes now save 30 minutes of problem-solving in about a week’s time! Allow yourself those couple of minutes. I promise that you will be rewarded with much less product lifting – good for you, good for your client.
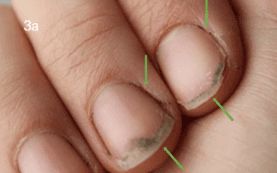
*Don’t forget, nail dust or dust from filing off artificial nail products can cause lifting problems at the free edge too! All the more reason for a quick wash after filing.
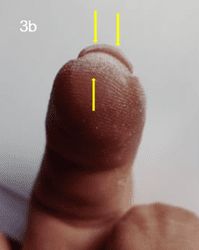
Recontamination of nail plate after cleansing
This is an interesting one that we don’t always realize is happening.
Sometimes working with artificial nail products takes time. Maybe you need to place forms and you’re not fast at that yet. Or the form got stuck on the nail plate. Maybe you are taking your time creating the right structure with a builder base coat. Whatever it may be, it does not matter. We don’t all work at the speed of light, and all of us work hard to improve our speed. Maybe our client is having an emotional day, maybe they rubbed their face after all your prep work. All these things can re-contaminate a nail plate after you have prepped it. If things take you a little longer, do one hand first. When it is complete, start the second hand. That way you greatly reduce the chances of it happening.
Excessive use of primer
Primers have a function in the nail world, they help to adhere products to problem nail plates. Some artificial nail products need them to adhere properly, as a matter of fact. It all starts with the condition of the natural nail.
- Removing the upper layer of the nail plate before primer application will make the nail plate unstable & contribute to possible allergies.
- ALL primers contain acrylates or cyano-acrylates of some kind.
The problems get worse if we cure primers incorrectly or if we overuse them.
Some primers air dry and some primers are cured in a UV/LED lamp. Be sure to always read the instructions from the manufacturer before using them.
Using too much primer or more than recommended, doesn’t improve adhesion:
- Floods the nail plate which then becomes too wet for proper adhesion.
- Can cause burning.
- Contributes to allergies.
Important: If we remove the upper layers of the nail plate all of the time instead of just removing the shine, we start to place our product on the ‘unstable’ nail plate cells that are the middle layers of the nail plate. This will always result in product lifting.
Incorrect Use of Base Coat
The Base Coat is the most misunderstood and abused part of our nail service. More importantly, it is THE most important part of our nail service!
Let me explain:
The ONLY layer of your artificial nail product or nail coating, even nail varnish that touches the natural nail is the base coat.
If the base coat does not adhere well to the natural nail, you can kiss the whole nail coating or enhancement goodbye sometime in the coming days. Product lifting will be inevitable.
In the beginning, Base Gels were high-adhesion, smooth, thin viscosity products.
Good adhesion promotors are some of the most expensive basis components in our nail industry, if you add those to a building gel you lose them in the mass product so if you use an all-in-one builder base coat a primer or bond will be essential.
Base Coat Gels are an efficient way to create maximum adhesion to the natural nail. In 2022, you can apply a high-quality base coat without roughing up or buffing the natural nail plate. Just using a high-quality nail plate cleanser will ensure that the integrity of the natural nail is maintained when artificial nail product coatings are used.
Some base coats achieve better adhesion if you use a primer or bonder – sometimes using a primer will also make the soak-off process easier. Some primers can and will extend the life of your soak-off product. It’s really important to not try and create your own recipe. Use the primer from the same company that provided your base coat.
Primers are specially formulated to match a system. Don’t be fooled into thinking the primer from company A will match the base coat from company B. You could end up cross-linking problem ingredients and end up with less adhesion instead of a better adhesion or, even worse, an allergy. Leave the chemistry to the chemists!
It’s important to realize that all base coats are composed differently. Some are made to soak off, and some are made to stay on the natural nail for longer. Be aware if you do a cosmetic pedicure that you will need a more durable base coat since your client is not likely to return to have her toenails done in 14 days.
Let’s recap:
- If your base coat needs to be cured for 10 seconds, don’t cure it for 30 seconds.
- Your color coat will only adhere to the base coat, control your base coat application – use your light to check that you have coated the entire nail plate.
- Use the color coat that matches the base coat. Otherwise, the inhibition layer in the base coat could adversely affect the color coat adhesion.
- Always cap the free edge of the nail with your base coat.
- Keep your base coat off the skin.
- If your base coat has a nail life of 14 days – remove the product after 14 days, even if it looks good to the human eye the product will already be breaking down. Infections from White Superficial Onychomycosis or Pseudomonas Aeruginosa become a real possibility since both are part of our natural microbiomes (they already exist on our hands & feet)and are opportunistic. This means that, given the chance, they will develop in or on the natural nail plate.
- Always wash hands with soap and water and dry well before the base coat application (this will remove most surface pathogens like WOS & PA)
- Do your PREP and or PEP according to the manufacturer’s instructions.
- Don’t rough up the nail plate with a file before applying your base coat, use a good quality nail plate cleanser instead, nail plate integrity is everything for a long-lasting service.
- If you want a longer-lasting base coat – buy one.
- When your client has flexible nail plates, use a flexible nail coating also the base coat.
- If your client has (open) beaded ridge nail plates a soak-off product might not be smart. Use a thin layer of Liquid & Powder that you can rebalance instead – or a thin layer of an Acrygel that you can rebalance – your client will thank you for it.
- If you want a soak-off product, make sure you soak it off in time and according to the manufacturer’s instructions. 10 mins = not 5 mins 😊 if your base coat adheres well to the natural nail, the only thing you will gain from saving 5 mins is 5 months of adhesion problems.
- Make sure you know what your client expects their nail coating or nail enhancement to endure, and choose your base coat to fit their expectations and lifestyle.
Uncured Product
Uncured product is a problem because we don’t often see the problem it can cause until later (24/48hrs later). Also, I have yet to meet a colleague that has x-ray vision! Sometimes it takes a few hours for the upper layer of your nail coating to collapse.
Let’s have a look at the problems that can occur from under-curing:
- Wrinkling & Bubbling
- Peeling
Wrinkling & bubbling: Usually happens with dark colors, black, dark blue, dark green, etc.
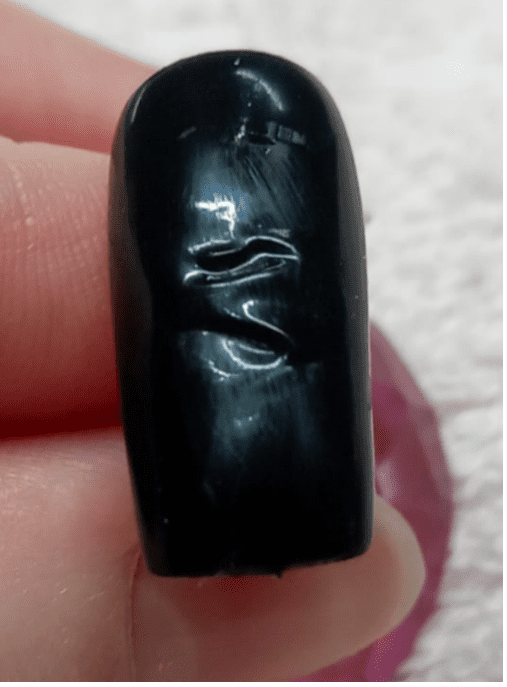
- The product is applied too thickly
- UV/LED light cannot penetrate the color. When this happens, the upper layer of the product is cured but, because the UV energy could not get deeper, the bottom half of the product stays fluid.
- Apply 2 thin layers instead of 1 thick layer – don’t worry about blotching, the 2ndcoat will cover that.
- Check that your UV/LED lamp still works as well as it should. You can test this by placing some product on a form, curing it, then lifting it to see that the product is hard all the way through.
- The UV/LED lamp does not match the product
- Use the UV/LED light that matches your product.
Your UV/LED light is one of the most critical pieces of equipment in your salon. Nanometers are everything when it comes to product cure but even the best UV energy has trouble penetrating thick, dark colors, leading to product lifting.
One of the best investments that you make will be in the lamp that matches your product. The next best investment is in your own product control skills.
Peeling or chipping:
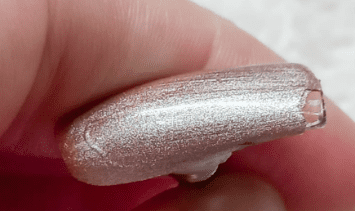
- Hand placement in the lamp is not as it should be
- Check to see if the placement of your client’s hand is as it should be. Thumbs have always been a problem, but nowadays manufacturers create UV/LED lights with extra Light Emitting Diodes (the little lights) where the thumb should be.
- The nail plate was not properly prepared before product application
- Sometimes we forget to clean the free edge with our cleanser. It could also be that there is some file dust under the free edge. Take a minute to turn the hand upside down before the product application, just to make sure. When your client washes their hands with soap & water before your PEP or PREP, give them a nail brush to clean well under the free edge. Dry well and be sure to cap the free edge with not only the base coat but also the color.
Unstable Nail Plates
- Nail plate filed too thin
- This creates an unstable nail plate at the free edge but also a huge problem when the nail grows.
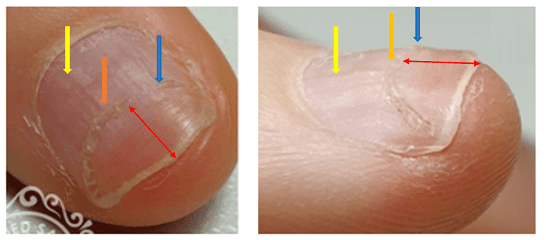
- Yellow arrow: A normal ridge in the nail plate, not pretty but we can deal with it.
- Blue arrow: Gouged out nail plate (the arrows showing the same position at a different angle). The problem here is not only that your product will lift but its shredded. Pocket lifting is possible here too if we put product on this now.
- Orange arrow: Gouged out nail plate (the arrows showing the same position at a different angle)
- Red arrow: The amount of nail plate filled thin that needs to grow out before you can do anything with artificial nail product.
Product lifting is almost guaranteed and worse still, this client probably wants these ugly nails covered so the look amazing even if they are not. Explain how you’re going to solve the problem and why putting product on this nail plate is not a smart thing to do. The chances of a nail plate infection caused by WSO or PA is waiting to happen and any product you do apply will likely lift. That would be a waste of your time and a waste of your client’s money.
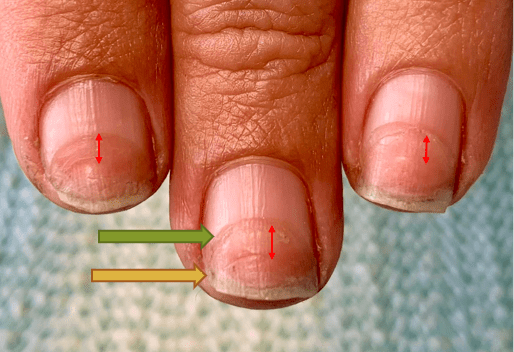
- Green arrow: Old filing damage growing out
- Yellow arrow: Older file damage growing out
- Red arrow: The amount of time between nail service is visible. If this nail plate grows at a rate of 1mm every 10 days then there was about 25 days between visits to the nail salon.
Nail Biters
- The best thing you can do for a nail biter is to give them a bottle of nail & skin oil. Get them to use it every time their finger has been in their mouth
- Nail biters only have minimal layers of nail plate left – remember the nail plate is in perpetual motion 24/7. If you have been to the seaside arcade with the penny machines that push the top coin into the drop tray – the nail plate cells work in the same way. Like an escalator in a store. Your product will always lift somewhere, and your client will always rip the rest off with their teeth.
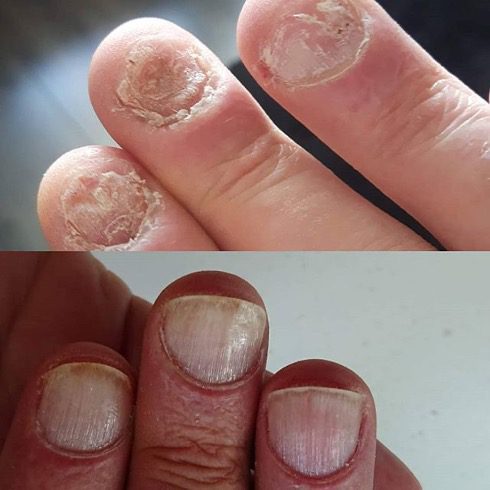
The nails in Fig 5 took 11 months to treat with lots of quality oil & lotion. But now these nail plates are ready for any product or no product.
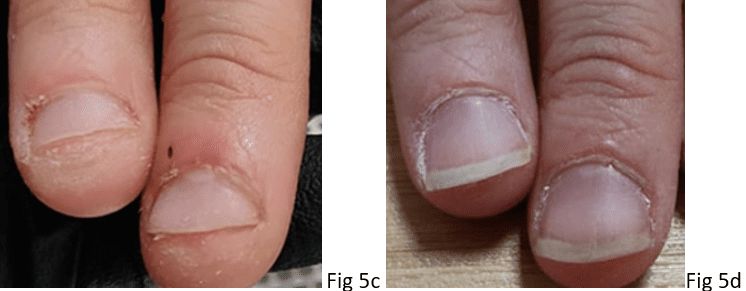
- Insufficient nail plate to place product
- Nail biters just keep on biting
- Fig 5c: trying to place nail products on a few millimeters of nail plate will result in tears and a never-ending repair work.
- Fig 5d: recovered nail plate ready for product, the client can still use more oil to help the proximal nail folds recover from keratinization, but the progress is obvious, now you won’t have a problem with product lifting, and the client can see the advantages of not biting 😊
Using tips on your nail biter:
I know a lot of nail techs do use tips on nail biting clients but try to resist the pressure, don’t be afraid he/she will go to another salon, explain the advantages of not doing it.
Tips are a great tool in nail world, but once your nail biter gets his or her teeth underneath it, they will just rip it right off, this will cause even more damage to the natural nail that you are trying to make look gorgeous.
Tips need glue to adhere to the natural nail, glue contains cyano-acrylates that are allergens if they come into contact with the skin and the chances of that happening with 1/3 of a nail plate to work with is high.
Also, all that damaged stratum corneum around the proximal nail fold – nightmare for perfect product placement with lifting being the inevitable result.
Oil, oil, and more oil – give it 6 weeks then strut your nail stuff!
Remember – A temporary fix may look good for a day or 2 but is not a real fix. Solve the nail plate problem first and you will have a client in your salon for life.
Incorrect Size and Fit of Artificial Nail Tips
It’s important to choose the right size of tip for the nail of your client, but If in doubt use a flexible nail tip that is straight. Apply it only to the free edge of the nail (unless of course it’s a full cover tip – even then fit is really important).

If the tip is too big, you will create a flat C curve; if it’s too small, you will create a ‘staircase’ effect at the lateral nail fold and the free edge.
I’m going to keep this simple – Look for perfection training, all respectable brands have educators that do this.
Tip Glue
All tip glues or tip resins are made from or contain ethyl cyanoacrylate or cyano-acrylates.
- Cyanoacrylates are a family of strong, fast-acting adhesives with industrial, medical, and household uses. They are derived from ethyl cyanoacrylate and related esters. The cyanoacrylate group in the monomer rapidly polymerizes in the presence of water to form long, strong chains. They have some minor toxicity.
- Ethyl cyanoacrylates are also used in forensics for lifting fingerprints when traditional fingerprint powder cannot be used, for instance on very delicate items. This happens in an enclosed chamber that is heated to allow the ethyl cyanoacrylate to turn into fumes and so show the hidden fingerprint.
- Off-the-shelf consumer glues are unsuitable for cosmetic or medical hand/foot applications, as they are not cosmetic or medical grade, which means their solvent and cyanoacrylate formulations have not been evaluated and optimized to reduce toxicity and prevent foreign body or allergic reactions.
Basically, they are all super glues, and all contain allergens – be very careful not to get them on the skin.
Ethyl cyanoacrylate and cyanoacrylates have a limited shelf life. Solvents are added to the mix to help the adhesive solidify quickly. When you open a bottle of nail tip adhesive the solvents are evaporating, and the quality of the adhesive will reduce very quickly. If you don’t use it often, buy smaller bottles of 5ml and that will reduce wastage and frustration.
Old Glue
Nail glue has a limited shelf life. The older it gets, the less likely it is to form a sufficient bond to hold the nail tip in place. This affects its ‘stickiness’, and your nail tip extension will not last.
It is also important to remember that nail adhesives have a limited lifespan even when they are new. This is the reason why you should apply nail tips only to the free edge of the nail, 2 mm = 2 weeks of growth for the average natural nail.
The structure of your artificial nail product is what will hold your extension enhancement in place.
After applying tips, do not remove the excess dust with alcohol or nail cleanser, as this will accelerate the breakdown of the adhesive and/or weaken the plastic nail tip. It is better just to brush it off.
If you do not prepare the natural nail correctly, you will always experience pocket lifting that will in turn become the perfect breeding ground for resident or transient pathogens such as pseudomonas aeruginosa.
Make sure your client understands that with nail tip extensions they will always need to wear gloves when doing any tasks involving other solvents and/or water. This is why nail tips are not ideal for clients working in bars or other service industries.
Incorrect form placement
Form placement is something you need to practice and perfect. Once you have mastered it, you will never use a nail tip again.
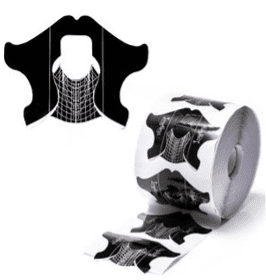
Forms have wings and lines. These are to ensure a perfect fit. Most brands have their own forms, all a little different in shape but all with the same goal in mind. Perfect form fitting creates a stable enhancement that fits the nail and the nail unit of your client. You can then place the artificial nail or extension with perfect alignment and balance.
Problems start when you start with a flat nail and do not adjust your form to match. The form needs to sit perfectly under the free edge of the natural nail, and you should create the C-Curve with the nail product. (See Picture E) If you leave a gap (because you are trying to create the C-Curve with your form) and the nail product leaks through the gap, even water from something simple like your client taking a shower will cause the product to lift in a matter of hours. (See picture D)
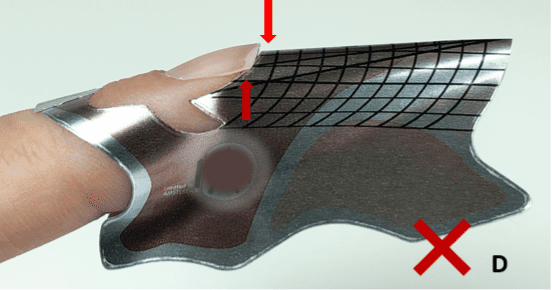
If you start with a curved nail and the form does not properly fit, the product will not cure as well as it should. Apply the product in thinner layers, and cure according to the manufacturer’s instructions.
With practice you will achieve this – see picture E
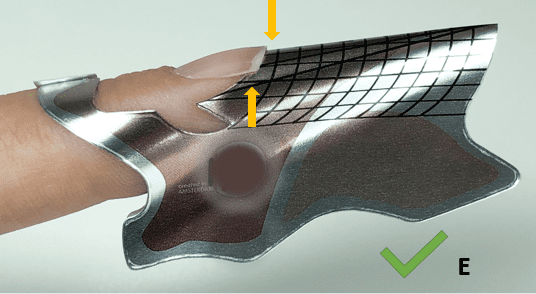
Form application takes practice. Ask your brand supplier about perfection training and form placement. When you get it right, you will have no problems with product lifting at the nail folds or the free edge.
Product touching the skin during application
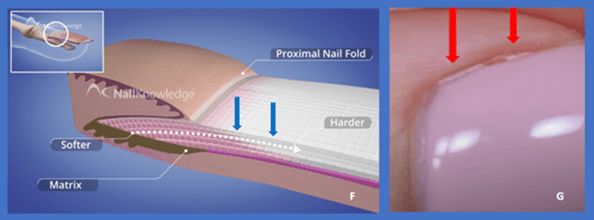
The nail plate cells are formed in the matrix and make their way along the eponychium (where the cuticle is attached). They then come out under the PNF where we see them as the normal nail plate. (Picture F shows this action in motion)
This happens 24hrs a day, 7 days a week! Disease or pregnancy can slow down or accelerate this motion.
If our product application is not as secure as it should be, maybe you’re in a hurry, maybe you didn’t bring your glasses to work or maybe the product you are using has a thin viscosity – the product might then drip into the lateral nail fold and become attached to your skin. (Figure G shows this)
In MasterClass 1.2 you can refresh your memory on this subject.
Let’s have a look at pictures F & G
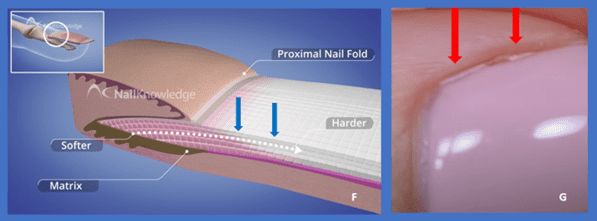
In picture F, you see 2 blue arrows; In picture G, two red arrows. So now imagine that they are in the same place in the lateral nail fold. F is in perpetual motion and G is static, the gel polish is hard and can only move with the nail plate. The gel polish that is in the nail grove will come loose and lift away, creating an opening. Water, oil, lotion, pathogens… Anything and everything can get between your gel polish and the nail plate! Product lifting will happen, and possibly an infection to boot!
It takes a lot of practice to place the product perfectly around the PNF and the Lateral Nail Folds. Therefore, invest in yourself and take the time to learn. If you can master straight lines with nail varnish, you will become an expert in straight lines in gel polish. Mastering this will make you more efficient in the salon.
Incorrect Mix Ratio Liquid & Powder (Acrylic Nail System)
Liquid Monomer and Acrylic Powder combined together make the perfect nail enhancement system. Once mastered it is a truly amazing product.
You can use it for:
- Toenail reconstruction
- Nail plate reconstruction
- Extensions
- Rebalancing
- It’s a reliable soak-off base for any system
- The perfect base coat for ridged nail plates
- Sculpting perfection
- Endless possibilities in nail art
It does have disadvantages:
- Liquid Monomer smells
- No ventilation can cause runny eyes, nose, and headaches
- Too wet – can trigger allergies
- Too dry – your enhancement will not adhere well to the natural nail
- In the old days – it was hard to file
- Fine dust particles
If you haven’t mastered L&P, product lifting becomes a problem.
Excessive Filing
Basically, uneven application of L&P will always result in product lifting or pocket lifting. You will want to file it until it is even. Eventually, filing through the enhancement is a real possibility, and filing through the nail plate is as well.
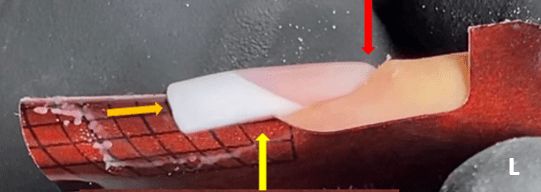
Using an acrylic brush you are not in control of, and a product that is too dry, may leave ‘doorsteps’ at the PNF. (see the red arrow in picture L)
The nail plate at the PNF is at its softest, and those nail plate cells have to survive intact for 5 months. Excessive filing here will not only damage your enhancement but also the nail plate, and the product will lift. Equally, if the form does not fit well, the side wall of the enhancement will not be strong (see figure L the yellow arrow) and the free edge will be uneven and weak (see figure L the orange arrow)
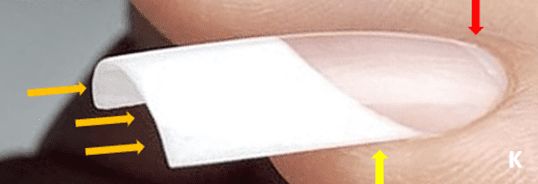
When the form is placed well and you have control of your L&P, you will not need to file excessively at the nail folds and your apex will be so strong the nail will last and last. (see figure K red, yellow and orange arrow)
Too Wet Product
If your L&P bead is too wet, the product running into the lateral nail folds (just like with the gel polish example in figure F) will cause the L&P to lift. Because L&P systems air-dry instead of curing in a lamp, you have more time to gently pull and hold back the skin at the nail folds during product placement and keep control of the product.
One more important reason for product lifting with L&P systems is shrinkage. L&P that is too wet will air dry at the wrong speed. When this happens, the excess monomer evaporates, the remaining polymer chains get pulled together, and the product tightens on the natural nail. This will not only cause pocket lifting that will be the perfect place for nasty pathogens, but it can actually be painful and heat will be generated by the chemical reaction caused by the polymers as they dry. Your client will experience this as uncomfortable pressure, maybe even intense heat hours later, and the enhancement will not last.
Practice, practice, a little patience, and lots of ‘bead making’ on practice sheets will ensure that you can create the perfect enhancement that will last longer than any other. A natural nail overlay with L&P will not only look stunning but, when placed well, it will wear as no other, and the rebalance will be done in 30mins.
Not using the right system for the specific nail type
Let’s go back to figure F. Remember the nail plate cells and their movement?
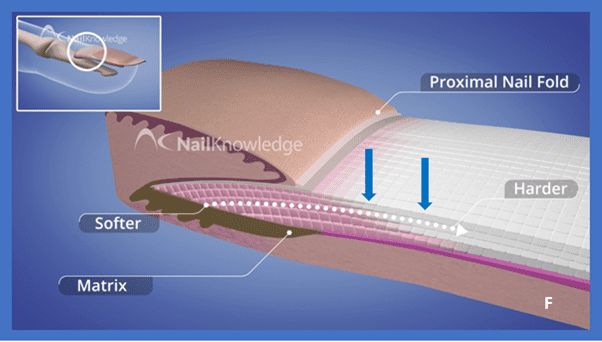
Marian Newman talks in Masterclass One about how the thickness of the nail plate is determined by the length of the matrix. The newest nail plate cells are softer, not quite ripe if you like.
Now imagine you have a nail bitter, with thin nail plates to start with, who cannot resist chewing their way through the remaining nail plate. Nothing good comes from putting a hard sculpting product on that very weak foundation! The reason why it will not go well is because the foundation (the nail plate) has incomplete chewed-up layers and is always in motion. Pocket lifting will be inevitable, with all the nasty stuff that comes with it.
A weak nail plate needs a flexible product thinly applied (if you are going to use a product). I would recommend first recovering the nail biter’s nail plate before considering any product application. But, if you must, maybe for a wedding or a special occasion, use a clear fiber gel (figure J:)
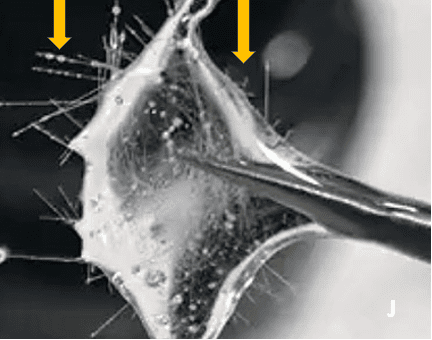
You can create simple small nails with a special effect nail varnish topcoat and your client will love you forever. He or she will have great looking nails with no problems, and you will be able to see through the product spotting any problems with lifting before things get out of hand. Get him or her to come back after the occasion – check that the nail coating is still intact, and no problems are occurring – if it’s not remove it!
Coaching as well as hand and nail maintenance is important here.
Pocket lifting
- Trauma
- Pinching
- Nail plate weakness
- Infections
Product lifting, in the context of nail care, refers to the separation or detachment of nail products, such as acrylic or gel enhancements, from the natural nail plate. This issue occurs when the applied nail product loses its adhesion to the natural nail, leading to gaps between the product and the natural nail or even complete detachment. Product lifting can be caused by different factors some of which we may (unintentionally) cause ourselves.
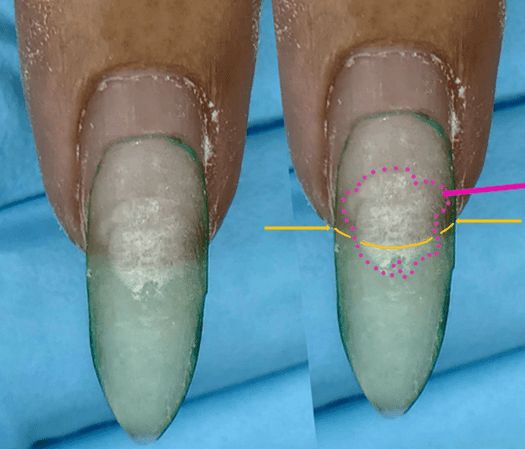
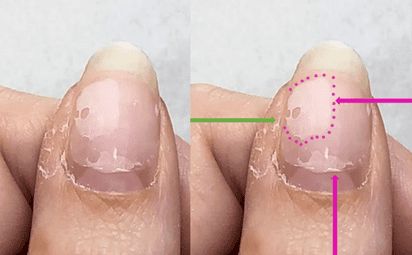
Trauma
If you knock the enhancement or nail coating while shopping, or while cleaning (even if you are wearing gloves) then the impact can cause the product to lift, and you won’t always see it from the outside. This pocket of air between the enhancement & the nail plate creates the perfect place for opportunistic pathogens. The problem is that because we have created gorgeous nails we don’t always see on time whats going on underneath – so a good rule would be, when in doubt, if you know you have knocked your nail remove the product to check if and what damage has been done and repair it as soon as possible.
Pocket lifting
Pocket lifting occurs when the nail product separates from the nail plate but not around the edge. If you are wearing a clear product its visible but if you have created something amazing or using dark colors – you can miss it.
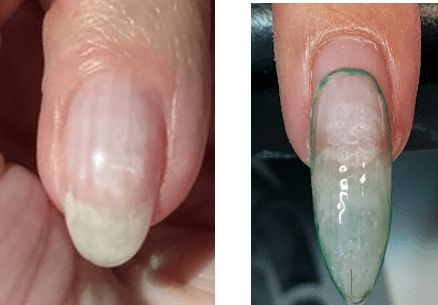
If it’s a natural overlay or a long extension – the result is the same, the nail enhancement is detached from the nail plate in the center – we can see it on the left nail because the enhancement is clear, on the right nail we only see it because we are rebalancing the enhancement.
Pinching
‘Pinching’ is something we do in competition to create the perfect C-Curve, it needs to be done well and with care because if we ‘pinch’ an artificial nail product and the nail product is too hard, product lifting becomes a real possibility. 30 years ago, pinching was the ‘norm’ and in competition is still a useful tool if you have been trained well.
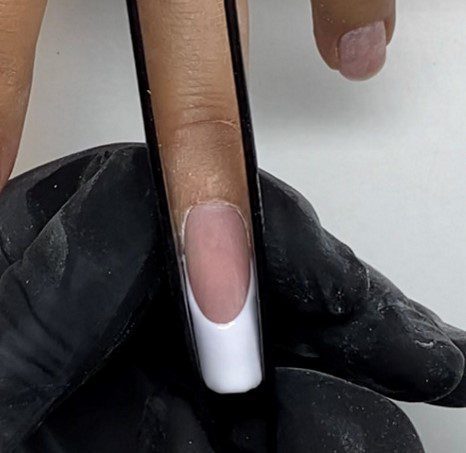
The C-Curve is pinched after product placement of the white to produce the perfect ‘C’ (This is done after the cover color is cured).
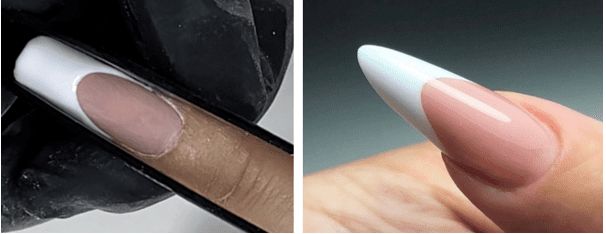
Today our products are more controllable and ‘building’ an apex and producing a C-Curve is easier if your form placement is well done but here also the rule is ‘product control is everything’ Done well you can produce gorgeous, long lasting nail extensions in the salon.
When you put the two side by side you see the difference but more importantly both effects are achieved without any pocket lifting – Product control, control of your pinching tool and good instructions are so important, you cannot achieve this kind of artificial nail without a good education and hours of training – but when you have mastered it, there is no looking back.
Nail Plate Instability or Weakness
If you ‘buff’ the natural nail before applying nail coatings of any sort, then, per definition, you are weakening the nail plate. If you also remove the skin from around the nail plate in the lateral nail folds & proximal nail fold, then you destabilize the entire nail plate. This creates an instability, a bit like building a house on sand instead of a solid foundation. Built on sand, the house will show signs of weakness or collapse, build on proper strong foundations the house will remain standing for as long as the building materials allow. The same is true for the nail plate when it ‘carries’ a nail coating. When the nail is intact and its surrounding seals are still in place the nail coating will remail attached to the nail plate for as long as the nail coating is made to last, if we remove any or all of the essential parts the nail plate becomes unstable and our nail coating will per definition become instable and weak.
Sometimes we get a little too enthusiastic when we are told to ‘remove the shine’ from our nail plate with a file. It’s better to think about replacing the buffer file with a really good nail plate cleanser. Your product will adhere to the natural nail well and the nail plate will remain strong. Remember, the nail plate is, on average, only 0.380mm thick. Not a lot of filing is needed to remove not only its upper layer but removing too much will definitely influence its stability & invite pathogens in!
It is also possible that you applied a nail coating to a nail that was damaged by a nail biter or nail picker, the foundation is unstable and your nail coating is vulnerable, its smarter to solve the nail plate structure problem first.
There are professional products on the market that create an ‘interpenetrating polymer network, in the nail plate. Strengthening the nail plate while maintaining a healthy flexibility is important, however, you should make a plan to completely recover the nail plate before applying any product at all. Care & maintenance with oil & lotion is essential but your client may want an ‘instant result’ and of course, we understand that, but sometimes taking a little more time to recover the nail unit first is better for you and your client. If you understand why its important to take a little time to recover the nail unit first, you can explain this to your client and he or she will love you for it.
For ‘special occasions’ its possible to create gorgeous nails that stay in place for the occasion but that can be easily removed so that nail plate recovery or nail maintenance can continue after the fact – Using ‘Full Cover Tips’ or ‘Press on Show Tips’ could be a temporary option if you place them with care & remove them in accordance with the manufacturer’s instructions.
Infections
Infections can happen to anyone, anytime, whether you are a professional or hobby nail tech or doing your own nails and infections in or around where the product has lifted is simply a consequence of the product lifting.
We always have pathogens and microbiomes with us, they are a part of our normal daily life, most are essential to our wellbeing but sometimes, circumstances happen that create the perfect surroundings for them to allow their ‘nasty side’ to develop. Where your product is lifted from the natural nail becomes a cozy place for pseudomonas aeruginosa or WSO (white superficial onychomycosis) to develop and cause a riot. The problem is we can’t always see this happening because they are developing underneath our nail coatings.
If you notice that something has caused a problem, maybe you suspect an infection, remove the coating, cleanse well, use the First Aid Protocols, get a diagnosis and solve the problem before reapplying the product.
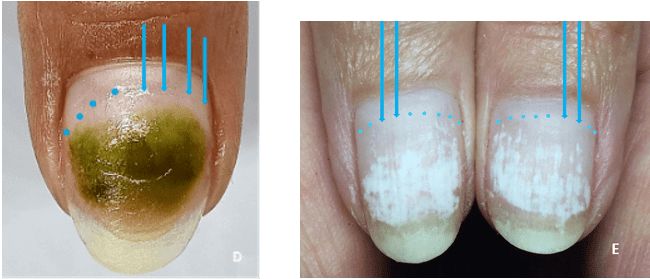
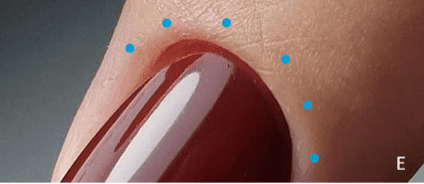
Fig D: Pseudomonas Aeruginosa after nail coating removal – the blue dots & arrows show where the edge of your nail coating was.
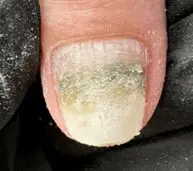
Fig E: White Superficial Onychomycosis after nail coating removal – again hidden under the nail coating.
Both of these infections are caused by our own body’s microbiome because we made it possible for them to develop. Hand & Nail maintenance with oil & lotion should be standard practice when artificial nail coatings or Nail Polish has been applied and we should be able to communicate this to our clients and to understand it ourselves whether we are DIY, students, or nail professionals – follow the same basic rules & the same hand & nail maintenance plan.
Nail plates affected by Hyperhidrosis
Excessive sweating or uncontrolled sweating (Palmer Hyperhidrosis) affects you’re the ‘cushioned’ part of your hands. Sweating occurs uncontrollably. Your hands may feel clammy or wet most of the time, it can happen at any temperature or during any season. The symptoms can increase in times of stress or anxiety. Socially it makes you feel uncomfortable shaking hands with someone, handing out papers at a meeting, or typing on a keyboard. Sweating happens without a trigger, not due to any external factor like exercising or an increase in body temperature. It can run in families, and it can be associated with other forms of hyperhidrosis or with certain medical conditions.
It can affect the nail plates because excessive moisture formed in the nail bed and around the nail can cause the nail plate to remain soft. If your client suffers from hyperhidrosis, it could be a contraindication for the placement of nail coatings because of the risk of creating the perfect conditions for. Only nail varnish is recommended.
Ref: 1. (see bottom of page)
Placing product underneath the PNF
This practice, without knowing where the eponychium starts or ends (during an excessive e-file manicure), is irresponsible.
Abusing the nail unit’s guardian seals is not a part of a nail technician’s (legal) competencies. Should an infection occur, as a result, and your client or student chooses to sue you, means you will need to have good insurance.

Nail plate abrasion has taken place well behind where the PNF should be closed onto the nail plate, and the seals that protect the nail matrix from pathogens have been removed. If you proceed to place artificial nail product under the removed PNF and cure it in a UV/LED lamp, as many do… you are contributing to factors that could result in an acrylate allergy for your client.
The eponychium is not visible from the outside of the nail unit. So you have no idea if you have caused damage or not. You also do not know how much product has cured under the remaining deformed nail fold. The product can just be washed away or travel back into the nail unit.
Soaking off product from nail units without guardian seals is a guaranteed way to invoke an acrylate allergy. Be very aware – By the time an allergy is recognized – it’s already too late.
Mixing systems
We all do it and we have all done it.
Mixing systems is fine if you are creating nail art for a Multimedia Tip Box Competition, assuming that you are working in a well-ventilated working area (as you should be). There is almost nothing more relaxing than doing that, especially if you have lots of unused nail stuff lying around. It’s a great way to use up all of it and maybe win a prize or 2 in the process. All good and all ok.
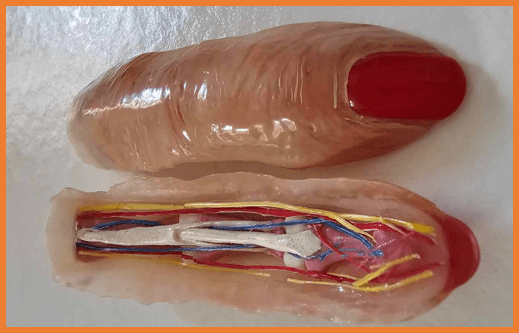
I’ve created some fingers for you, both the front and back sides. These practice nails are made from various artificial nail products, including leftovers such as acrygel, acrylic, paint, gel paint, nail glue, and plasti-love. These were never used on a client’s hand; they were just for fun. It’s a great way to make use of your surplus products and further develop your skills at home. 😊
But …
If you are creating gorgeous nails for a client that’s paying you money for the service, then you need to make sure that each layer of your enhancement is cured and layered as it should be. No matter if it is gel polish, acrygel, or acrylic.
Using a primer or a bond from brand A and then a base coat from brand B, or even a builder gel with a built-in base coat from brand B is asking for trouble. The 2 products could, instead of being matched, be adverse for each other.
Primer A – goes into the upper layer of the nail plate. The base coat of brand A then goes on the natural nail. The 2 products bind with each other and create the perfect fix on the natural nail.
Bonder B – lays on the natural nail, and cures in a UV/LED lamp. It then creates a sticky layer for the base coat of brand B to bind with, creating the perfect fix on the natural nail.
If you use primer A and combine it with the base coat of brand B – you are mixing chemicals and have no idea if it causes a problem or not until it’s too late. The product can lift, or it can even repel from the nail plate entirely. Worse still, it can create a reaction that may cause an allergy or a burning sensation for yourself or your client.
Chemists create our artificial nail products with care. Leave the chemistry to them!
Any brand should have a system that works from the primer or bond to the topcoat.
Use the UV/LED light that belongs to the system you use – don’t risk under curing products!
Mixing them without knowledge is like putting diesel in a petrol motor car. You don’t know how much damage you do until it’s too late. Believe me, I know! I have done it and it was hilarious until I paid the bill for having the diesel removed and my engine cleaned!
- An Bras Dermatol. 2016 Nov-Dec; 91(6): 716–725. Palmar hyperhidrosis: clinical, pathophysiological, diagnostic and therapeutic aspects*
Flávio Ramalho Romero,1 Gabriela Roncada Haddad,1 Hélio Amante Miot,1 and Daniele Cristina Cataneo1

